用 Vite 打造一個 Start Project

也許該更早開始用這東西。

簡述

在實際接手過幾項專案以後,我常常會看到一些程式碼風格與程式碼品質的問題,例如說:

  1. 到底該用單引號還是雙引號?
  2. 到底縮排要空 2 格還是 4 格?要用 Tab 還是空格?
  3. 該用箭頭函式還是普通函式?
  4. 不會被改變的變數是不是該一律用 const 來宣告?
  5. 沒用到的變數,或者是非必要的 console 是不是不該出現?
  6. etc…

雖然這幾個問題可以說是跟個人喜好有關,但我覺得在團隊合作上應該還是要有一個明確的規範比較好,一來是讓整個專案有一致性,二來是能讓下一個接手的人可以有更好的開發體驗(???

總之呢,這篇想要從頭開始用 Vite 來建立一個 Start Project,要整合的項目有:

  • React
  • TypeScript
  • ESlint(airbnb)
  • Prettier
  • Enviroment Variable

步驟

1. 建立 vite 專案(React + TypeScript)

1
npm create vite@latset

2. 初始化 ESLint

這邊會透過 global eslint 的指令來初始化,如果你沒有的話記得先 npm install -g eslint

1
eslint --init

接下來依序選擇:

  1. To check syntax and find problems
  2. JavaScript modules (import/export)
  3. React (framework)
  4. Yes (TypeScript)
  5. Browser
  6. JSON
  7. Yes (install all needed dependencies)
  8. npm

根據剛剛的選擇,接下來應該會幫你安裝底下這幾個套件:

  • eslint-plugin-react
  • @typescript-eslint/eslint-plugin
  • @typescript-eslint/parser
  • eslint

可以到 package.json 中確認:

1
2
3
4
5
6
7
8
9
10
11
"devDependencies": {
"@types/react": "^18.0.24",
"@types/react-dom": "^18.0.8",
"@typescript-eslint/eslint-plugin": "^5.45.0", // <- new
"@typescript-eslint/parser": "^5.45.0", // <- new
"@vitejs/plugin-react": "^2.2.0", // <- new
"eslint": "^8.28.0", // <- new
"eslint-plugin-react": "^7.31.11", // <- new
"typescript": "^4.6.4",
"vite": "^3.2.3"
}

到目前為止,打開 .eslintrc.json 的內容應該會是大概像這樣子:

1
2
3
4
5
6
7
8
9
10
11
12
13
14
15
16
17
18
19
{
"env": {
"browser": true,
"es2021": true
},
"extends": [
"eslint:recommended", // <- 這是預設的 config,等一會兒要換成 airbnb
"plugin:react/recommended",
"plugin:@typescript-eslint/recommended"
],
"overrides": [],
"parser": "@typescript-eslint/parser",
"parserOptions": {
"ecmaVersion": "latest",
"sourceType": "module"
},
"plugins": ["react", "@typescript-eslint"],
"rules": {}
}

如果你不知道這邊的內容是在設定什麼的話?可以到 ESlint - 配置一個 Airbnb 環境 參考,接下來我們要添加 airbnb 的 config。

3. 添加 airbnb 的規則

首先要安裝 eslint-config-airbnb,我都把它稱為 airbnb 組合包,內容物包含多個 plugin 和一個 config

  • eslint-config-airbnb:根據底下的 plugin 來撰寫的 rules
  • eslint-plugin-import:添加 import 相關的規則
  • eslint-plugin-jsx-a11y:添加 a11y 相關的規則
  • eslint-plugin-react:添加 react 相關的規則
  • eslint-plugin-react-hooks:添加 react hook 相關的規則

附註:再提醒一次,如果你不知道 config 跟 plugin 的差別,請參考 ESlint - 配置一個 Airbnb 環境

裝好後把 .eslintrc.json 的內容修改成以下:

1
2
3
4
5
6
7
8
9
10
11
12
13
14
15
16
17
18
19
20
{
"env": {
"browser": true,
"es2021": true
},
"extends": [
"airbnb", // <- update
"airbnb/hooks", // <- update
"plugin:react/recommended",
"plugin:@typescript-eslint/recommended"
],
"overrides": [],
"parser": "@typescript-eslint/parser",
"parserOptions": {
"ecmaVersion": "latest",
"sourceType": "module"
},
"plugins": ["react", "@typescript-eslint"],
"rules": {}
}

做到這邊後,你可以打開 App.tsx,然後加上 useEffect 來確認是否有讀取到對應的規則:

example1-check-rule

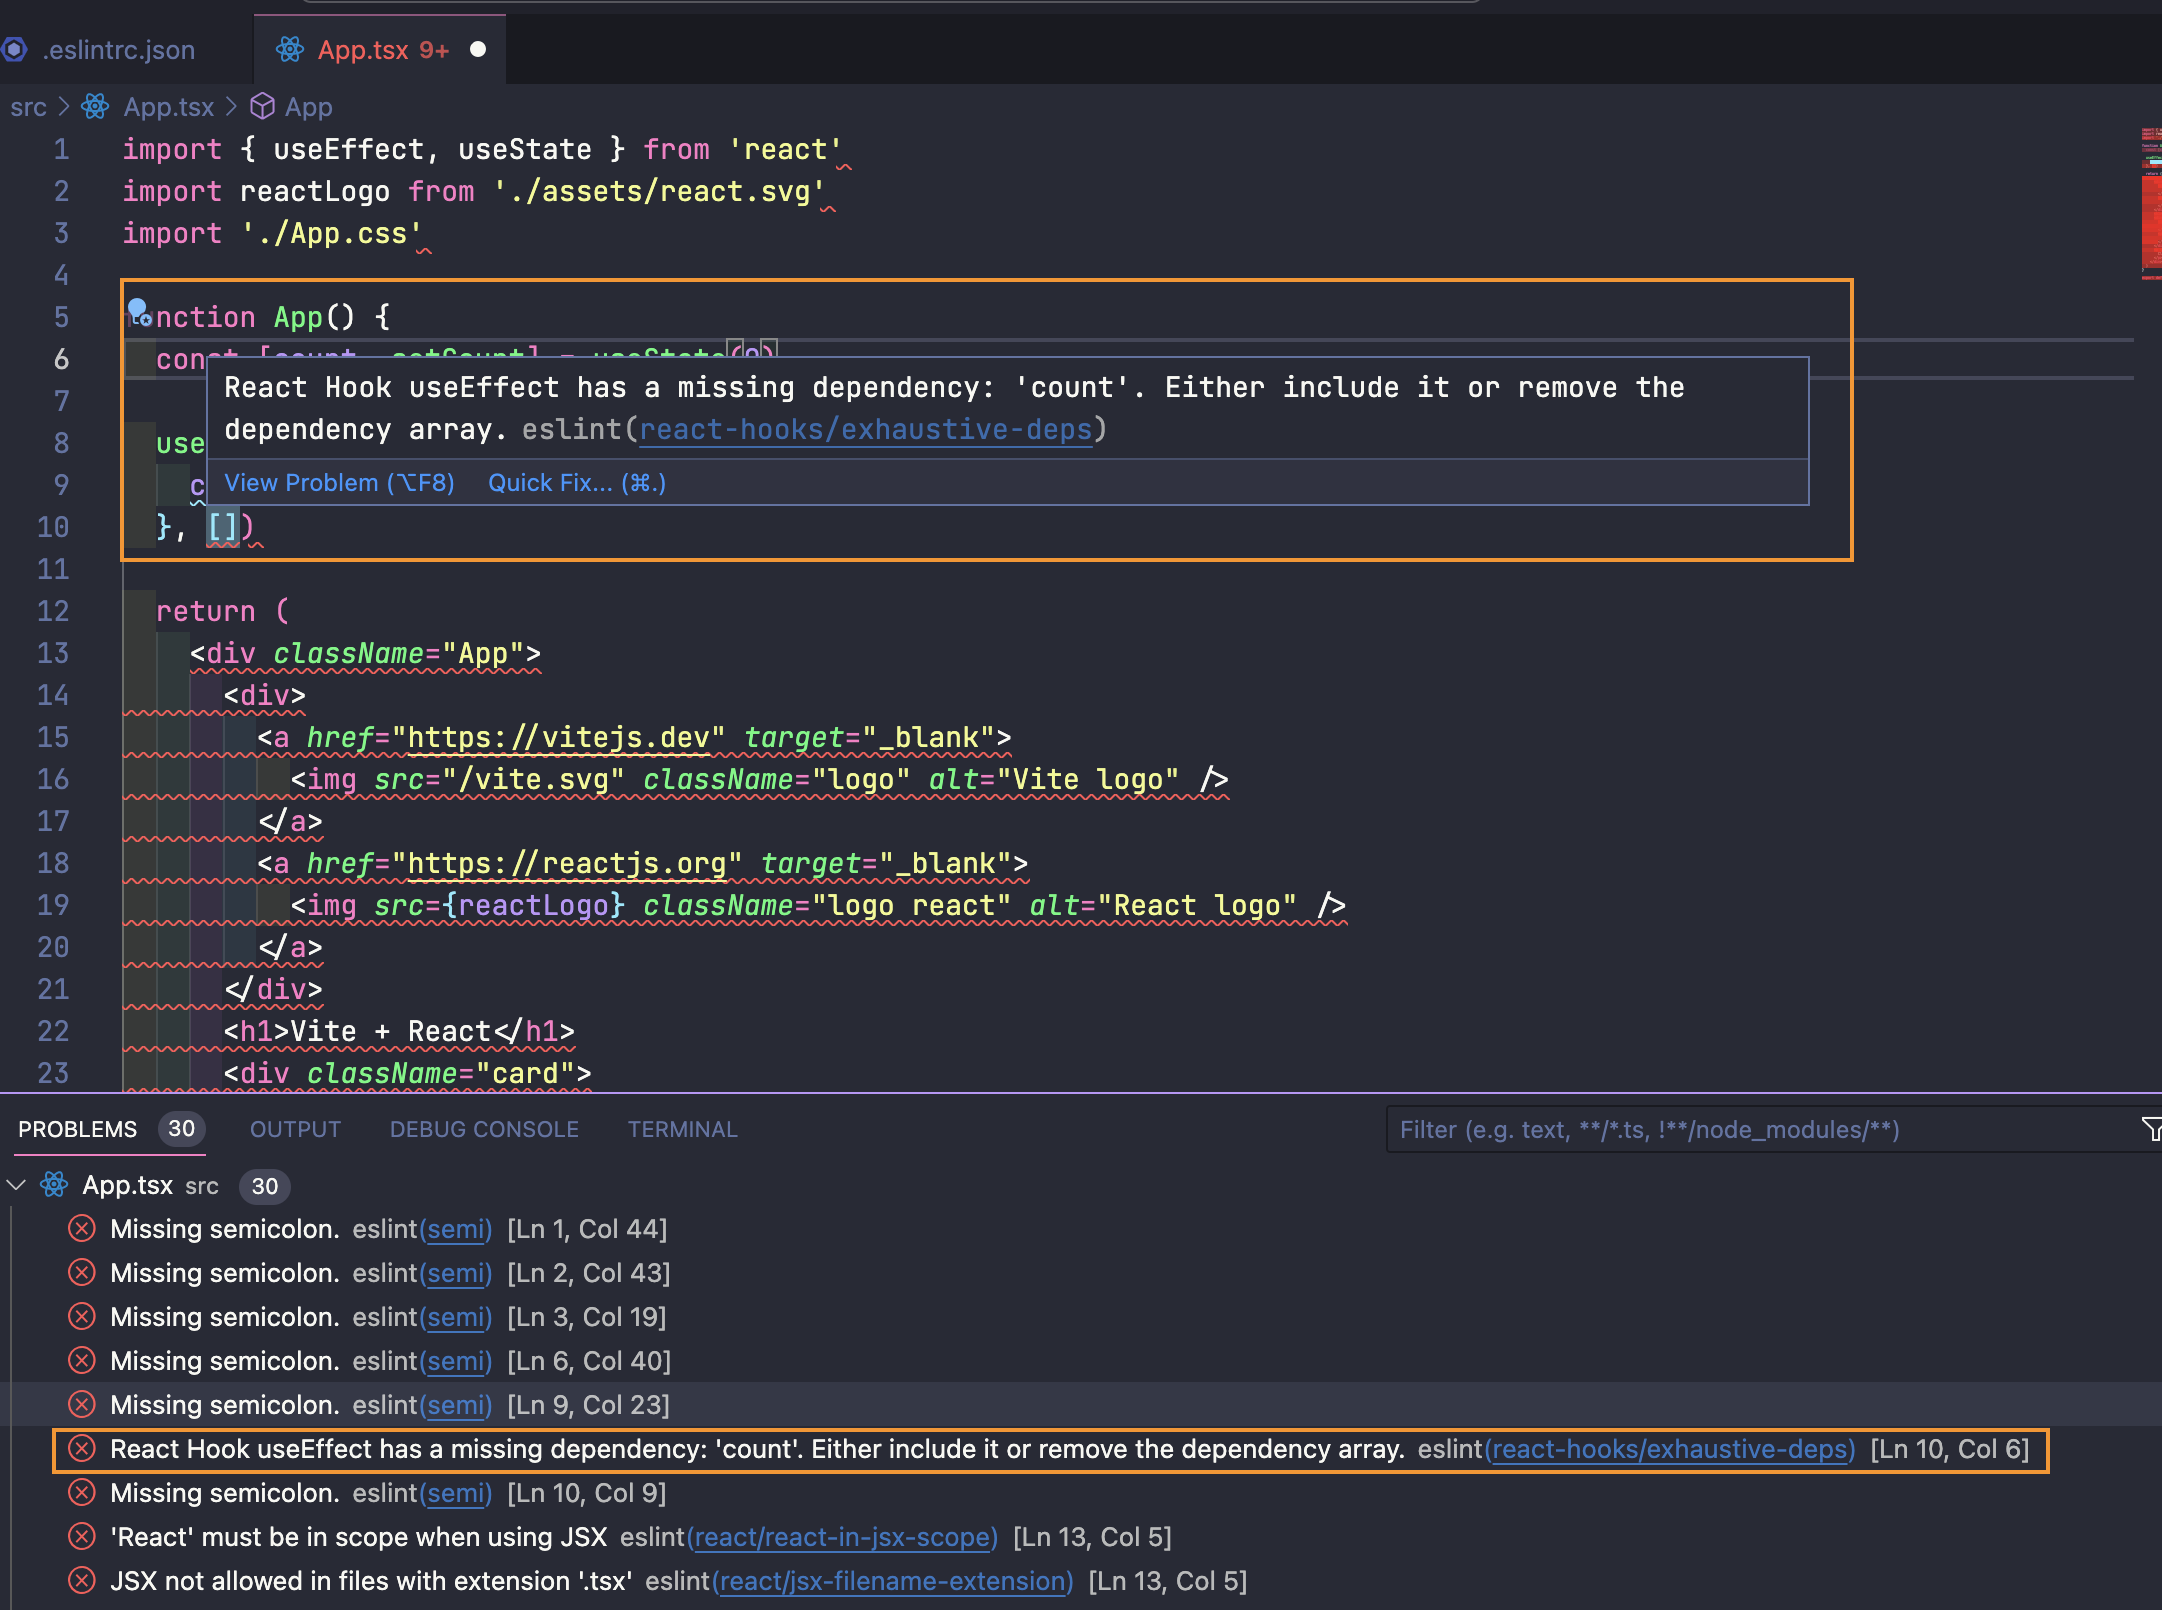
到目前為止,airbnb 的基本配置已經設定好了,接下來會先修復幾個你可能會碰到的問題。

4. 修復 import 的錯誤

打開 main.tsx 後會看到有一個錯誤是不正確的,像這個:

example2-ts-problem

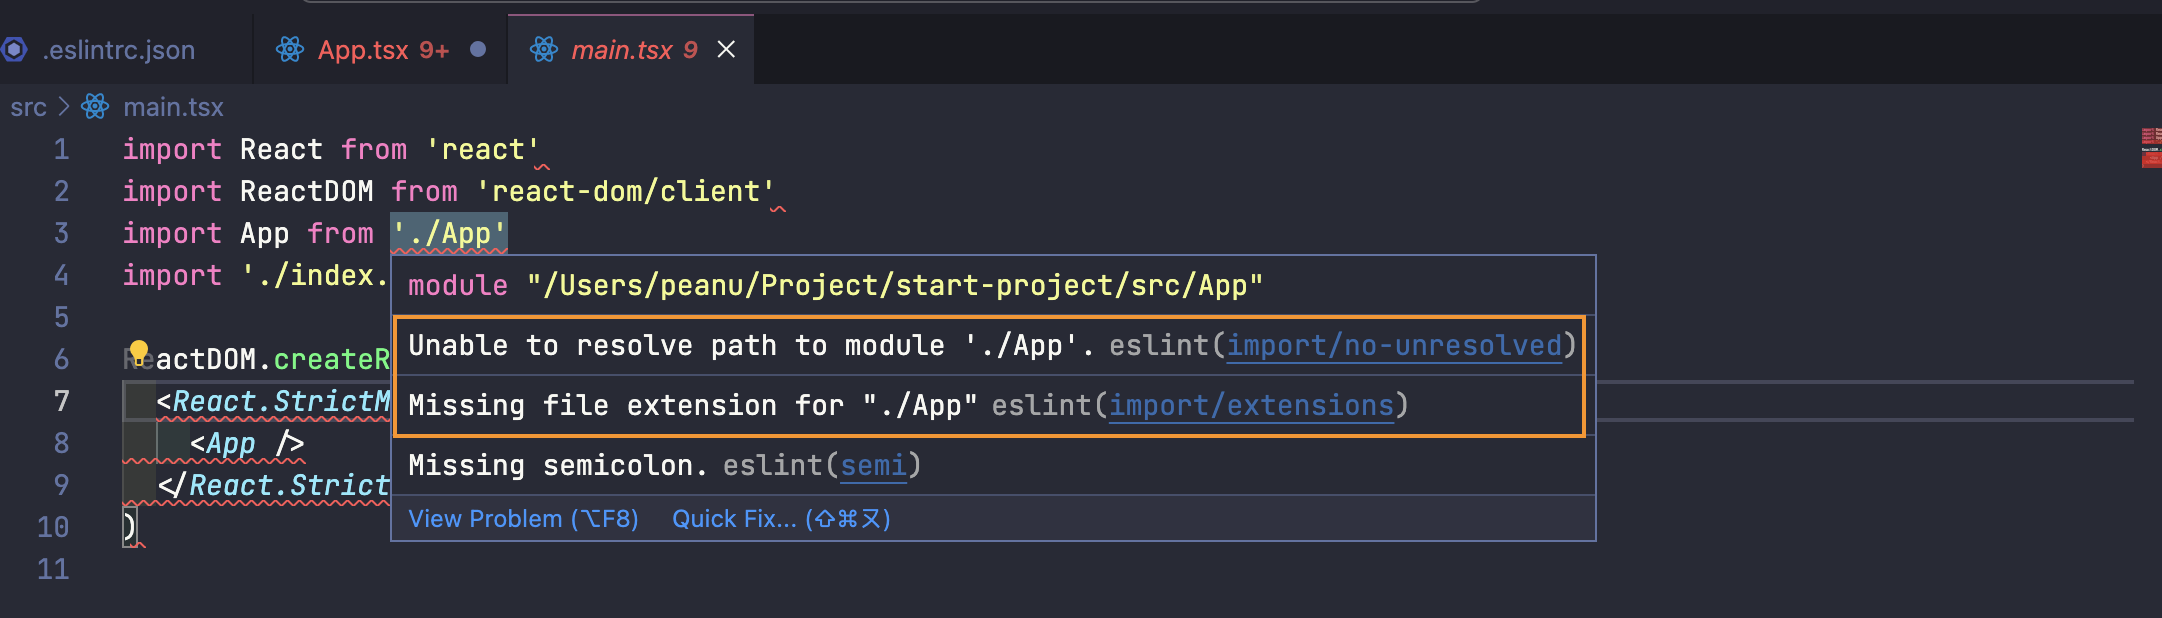
照理說我們這樣的引入方式應該是沒有錯的,但是卻會顯示副檔名和找不到模組的錯誤訊息。原因的話我猜是因為這裡用的是 TypeScript,所以在解析 .tsx 檔案時會有一些相容性的問題。

解法方法是安裝 eslint-config-airbnb-typescript 並把 .eslintrc.json 的內容修改為底下這樣:

1
2
3
4
5
6
7
8
9
10
11
12
13
14
15
16
17
18
19
20
21
22
{
"env": {
"browser": true,
"es2021": true
},
"extends": [
"airbnb",
"airbnb/hooks",
"airbnb-typescript", // <- 加上新的 config
"plugin:react/recommended",
"plugin:@typescript-eslint/recommended"
],
"overrides": [],
"parser": "@typescript-eslint/parser",
"parserOptions": {
"ecmaVersion": "latest",
"sourceType": "module",
"project": "tsconfig.json" // <- 填入 tsconfig.json 的位置(有沒有 ./ 都可以)
},
"plugins": ["react", "@typescript-eslint"],
"rules": {}
}

簡單來說這邊做的事情是讓 ESLint 去透過 tsconfig.json 來解析 .tsx 相關的檔案,所以設定好後應該就能看到問題解決了:
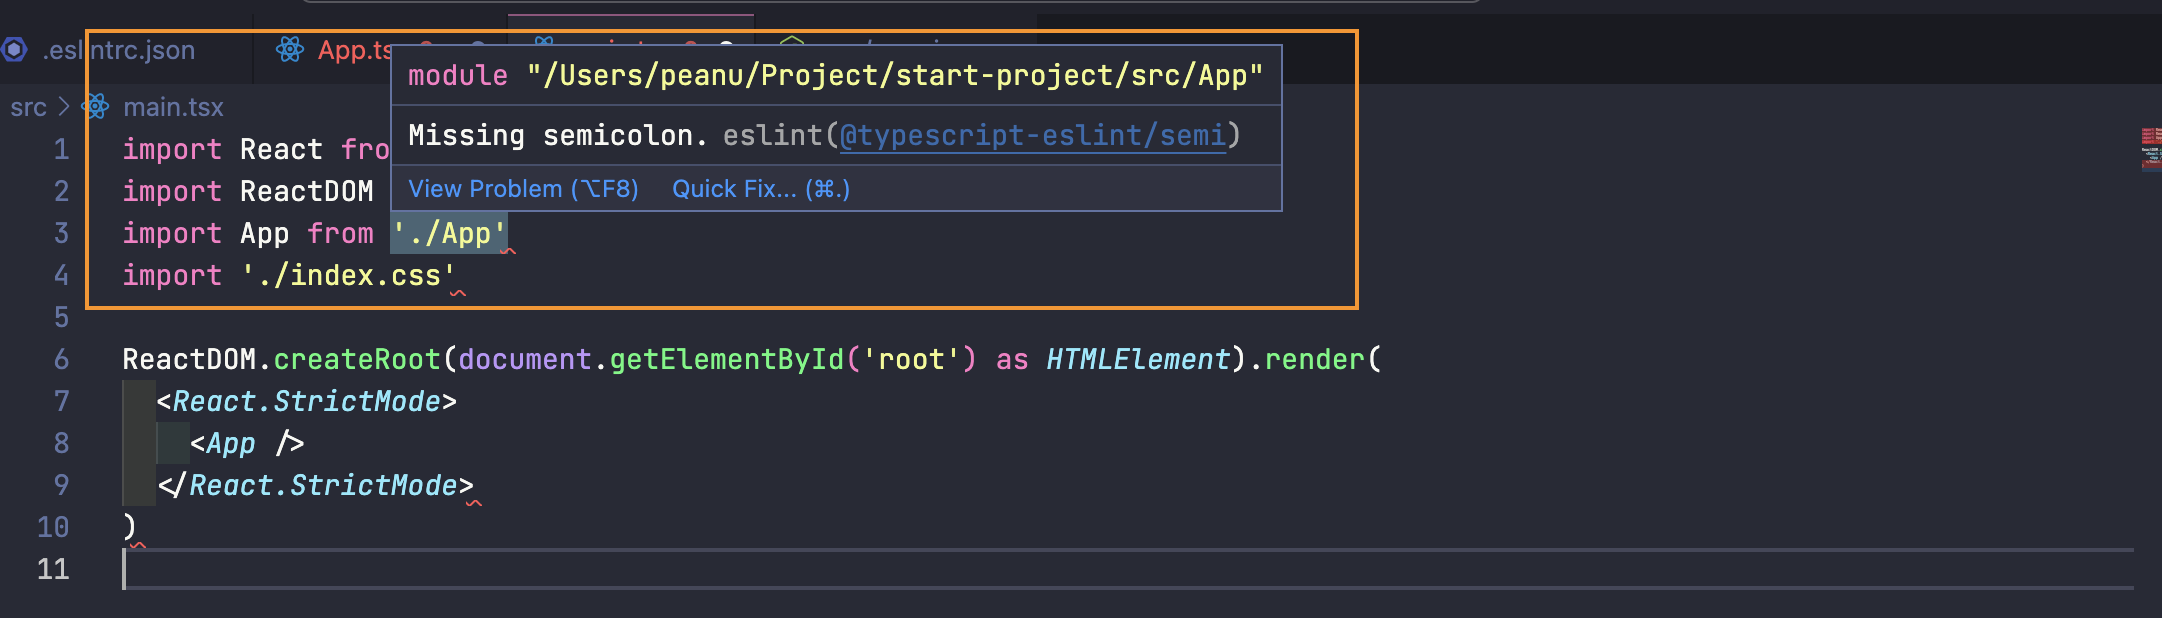
example3-solve-ts-problem

附註:沒有剛剛的 import 問題了

5. 修復 vite.config.ts 的錯誤

修正完剛剛的錯誤後打開 vite.config.ts 會發現另外一項錯誤:

example4-vite-problem

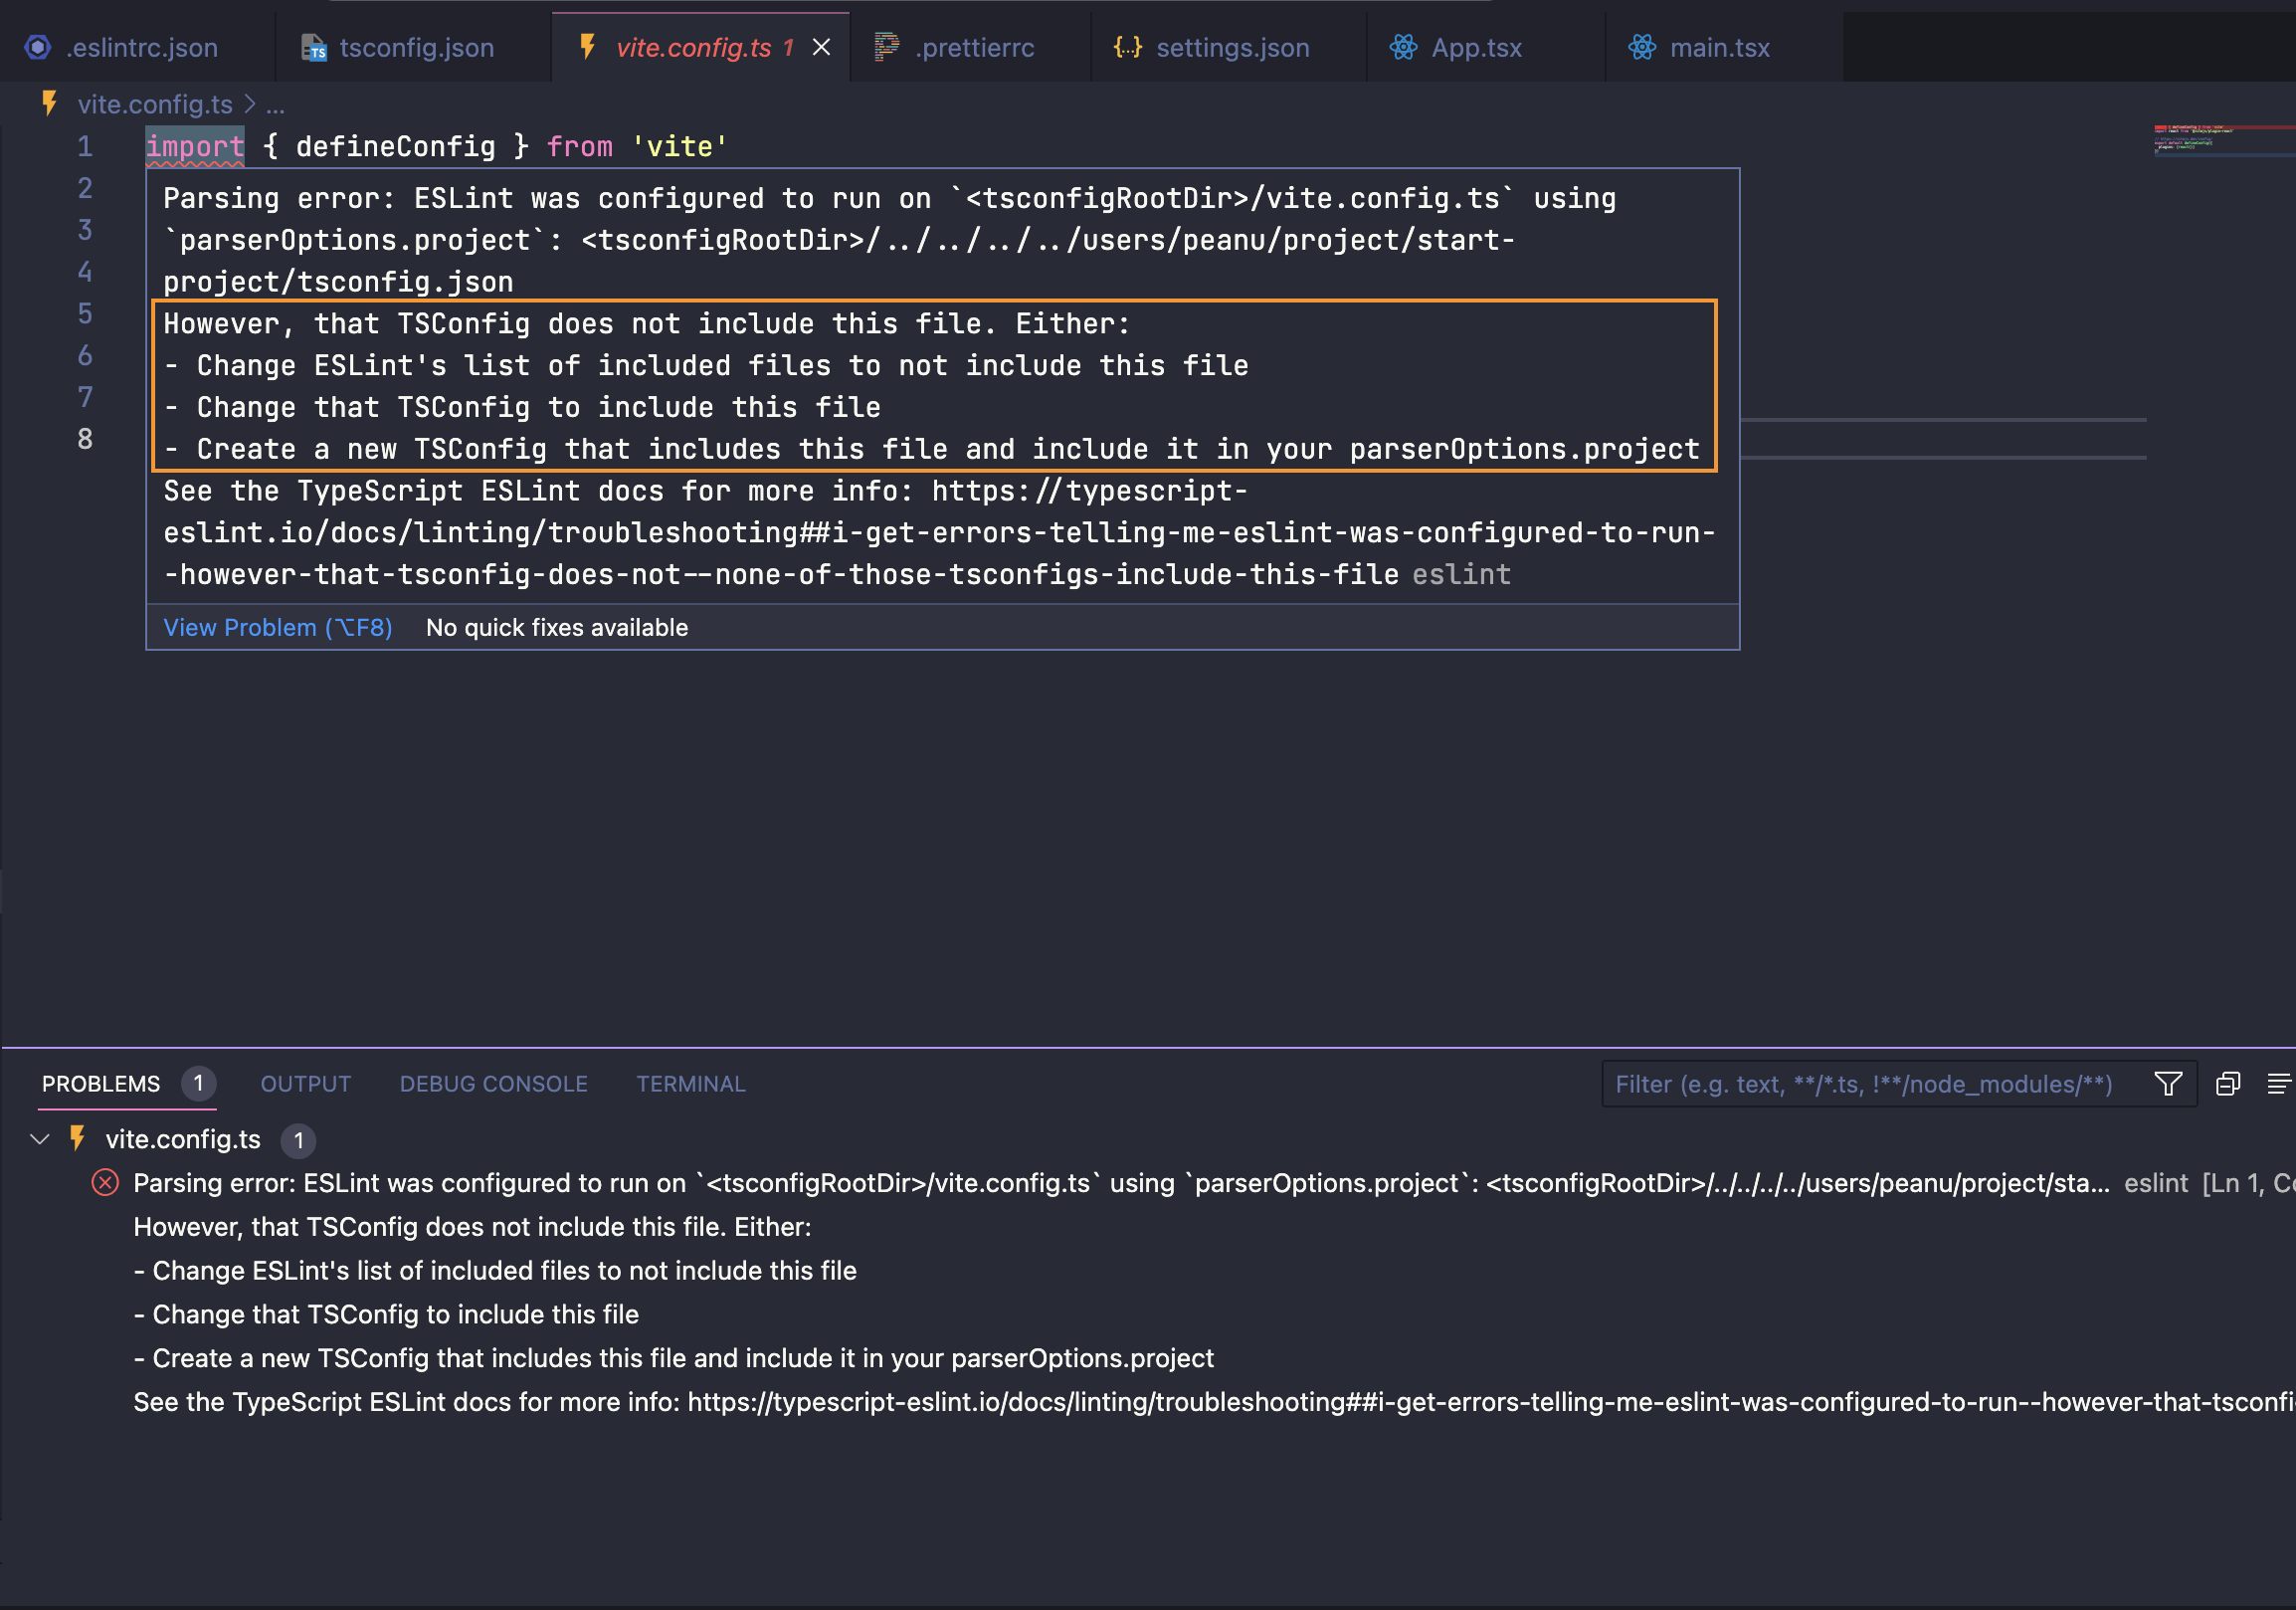
簡單來說,這邊的意思是我們剛剛透過 parserOptions 讓 ESLint 用 tsconfig.json 來解析檔案,但 ESlint 發現 vite.config.ts 並沒有被包含在其中:

1
2
3
4
5
6
7
8
9
10
11
12
13
14
15
16
17
18
19
20
21
22
// tsconfig.json
{
"compilerOptions": {
"target": "ESNext",
"useDefineForClassFields": true,
"lib": ["DOM", "DOM.Iterable", "ESNext"],
"allowJs": false,
"skipLibCheck": true,
"esModuleInterop": false,
"allowSyntheticDefaultImports": true,
"strict": true,
"forceConsistentCasingInFileNames": true,
"module": "ESNext",
"moduleResolution": "Node",
"resolveJsonModule": true,
"isolatedModules": true,
"noEmit": true,
"jsx": "react-jsx"
},
"include": ["src"], // <- 只包含 src 底下的檔案
"references": [{ "path": "./tsconfig.node.json" }]
}

解決的方式就是把 vite.config.ts 填進去就可以了:

1
2
3
4
5
6
7
8
9
10
11
12
13
14
15
16
17
18
19
20
21
{
"compilerOptions": {
"target": "ESNext",
"useDefineForClassFields": true,
"lib": ["DOM", "DOM.Iterable", "ESNext"],
"allowJs": false,
"skipLibCheck": true,
"esModuleInterop": false,
"allowSyntheticDefaultImports": true,
"strict": true,
"forceConsistentCasingInFileNames": true,
"module": "ESNext",
"moduleResolution": "Node",
"resolveJsonModule": true,
"isolatedModules": true,
"noEmit": true,
"jsx": "react-jsx"
},
"include": ["vite.config.ts", "src"], // <- 把 vite 加進去
"references": [{ "path": "./tsconfig.node.json" }]
}

example5-solve-vite-problem

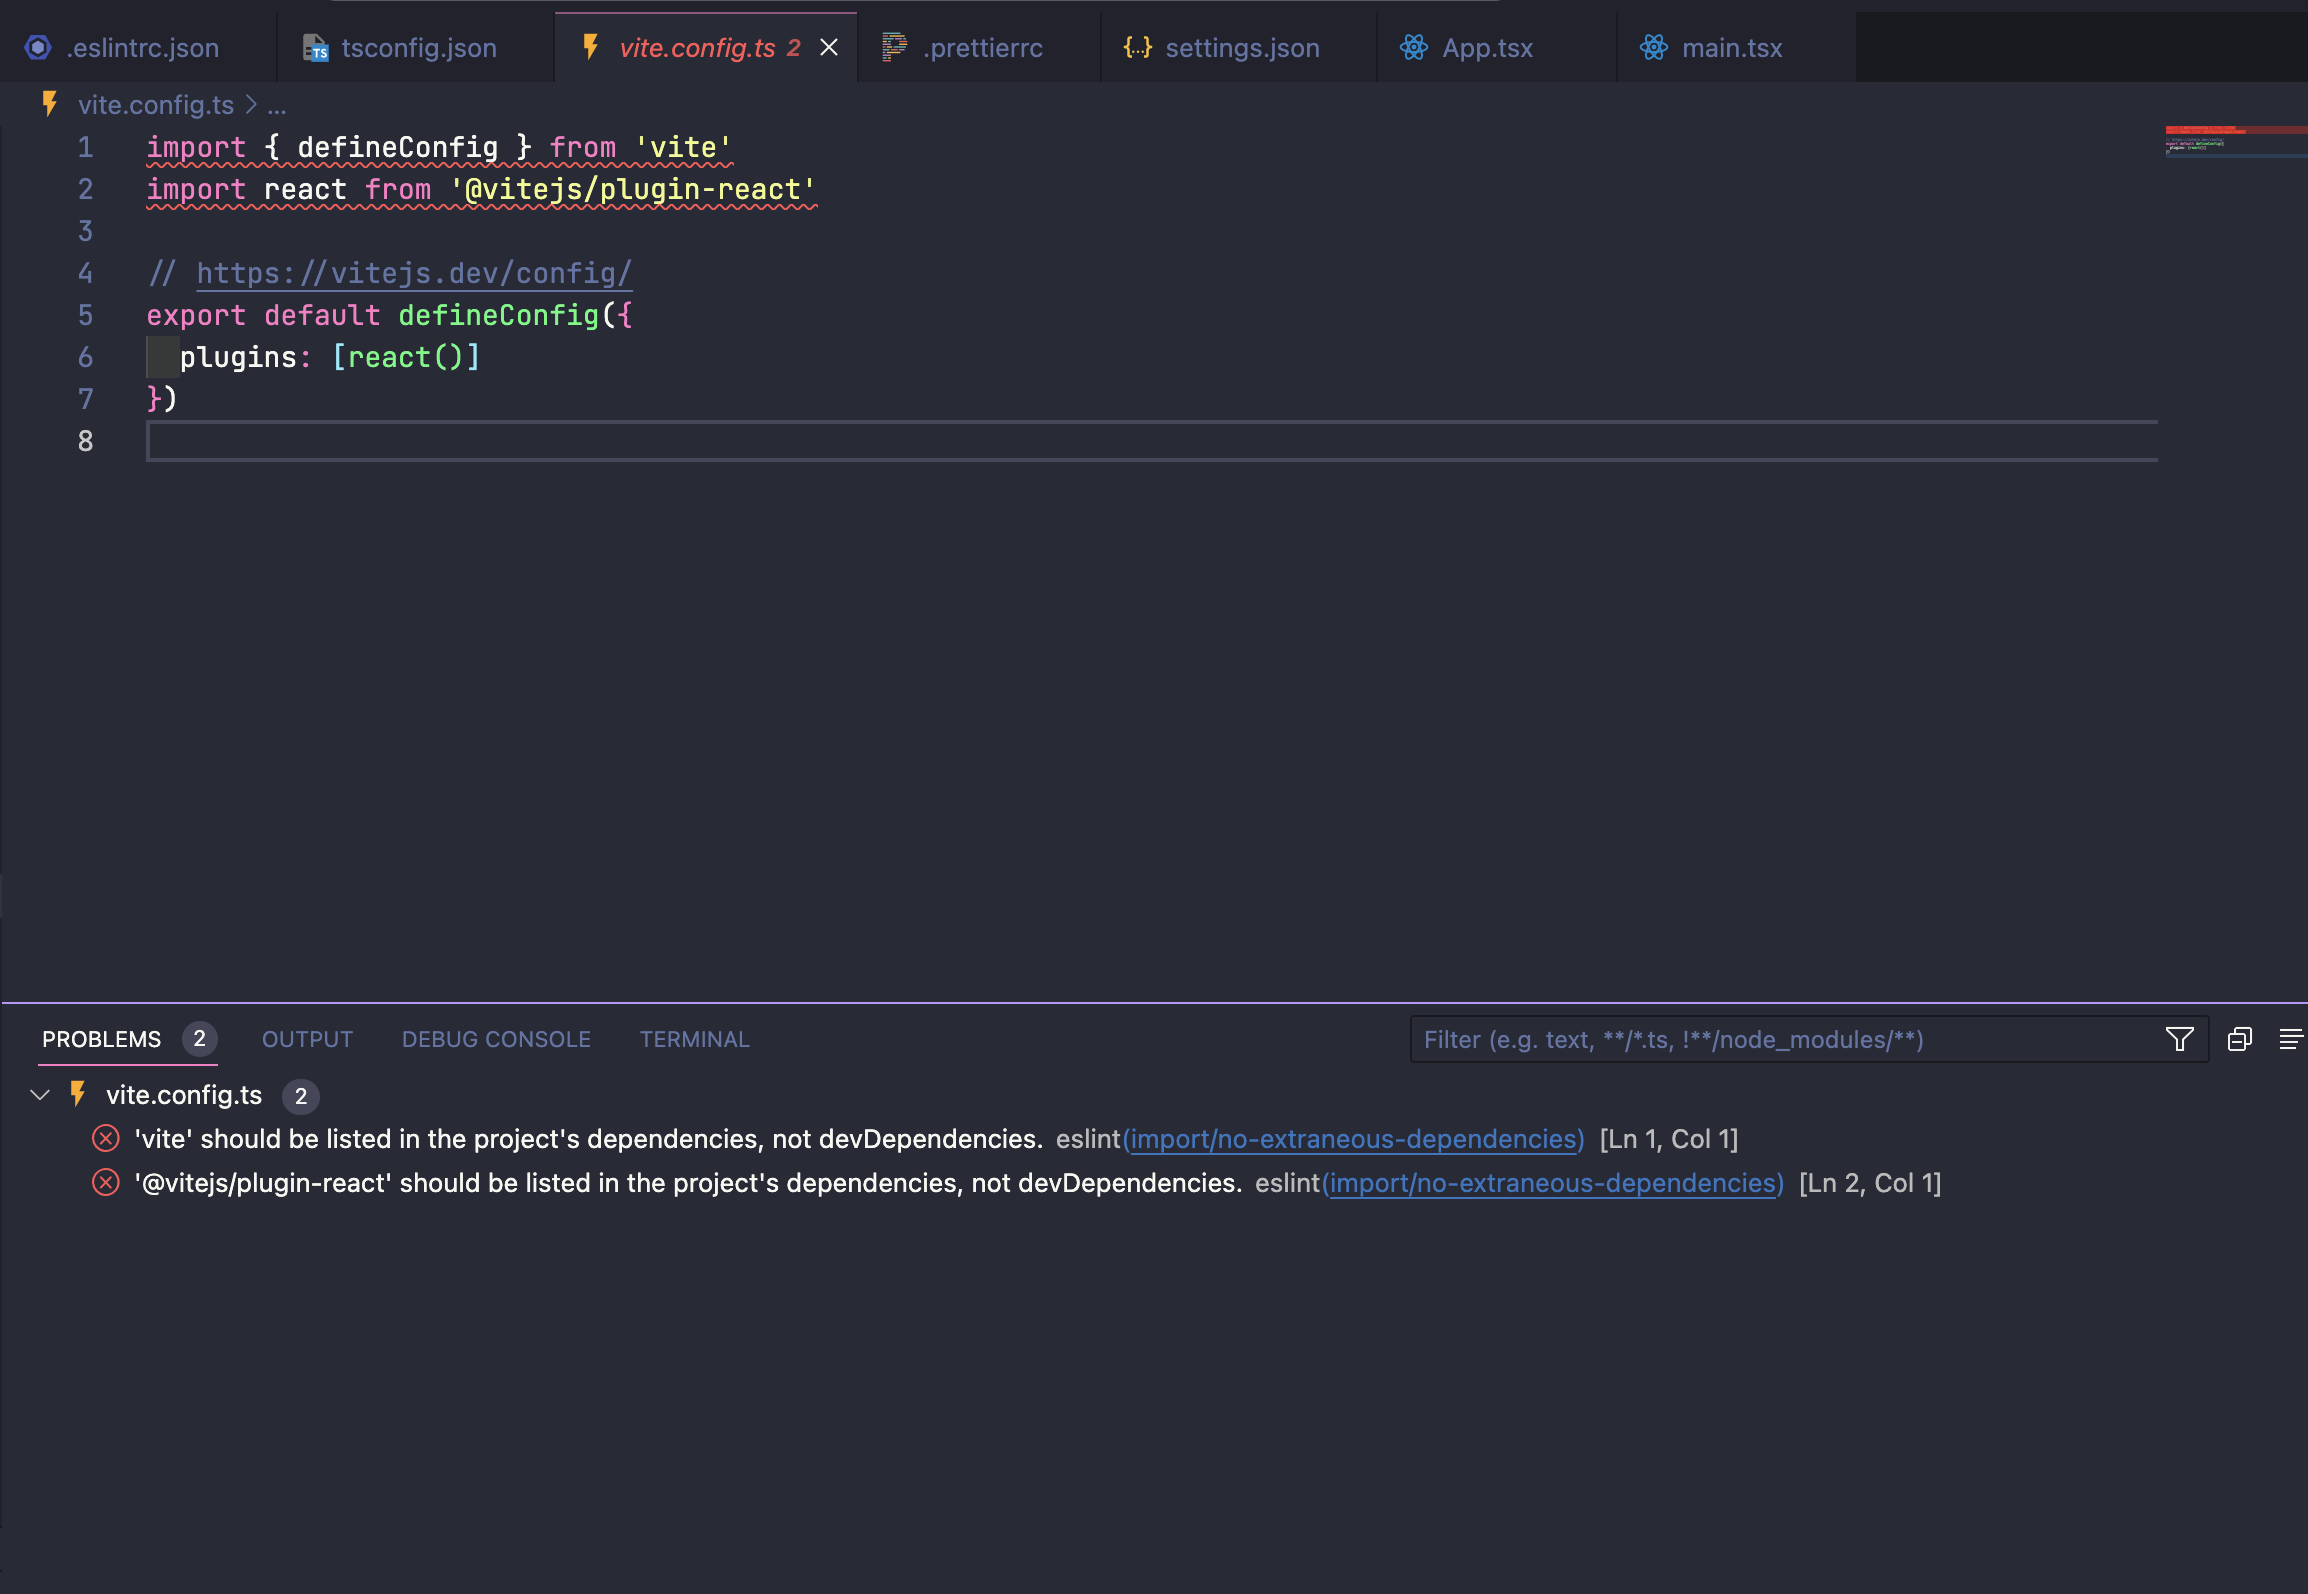
雖然變成了另一項錯誤(iport/no-extraneous-dependencies),但可以看到剛剛的錯誤確實消失了,

至於這個新的問題是在提醒我們是不是裝了沒用的 dependencies,不過以目前的 case 來說其實是有用的,建議到 .eslintrc.json 對這項 rules 調整一下就好:

1
2
3
4
5
6
7
8
9
10
11
12
13
14
15
16
17
18
19
20
21
22
23
24
25
26
{
"env": {
"browser": true,
"es2021": true
},
"extends": [
"airbnb",
"airbnb/hooks",
"airbnb-typescript",
"plugin:react/recommended",
"plugin:@typescript-eslint/recommended",
"plugin:prettier/recommended"
],
"overrides": [],
"parser": "@typescript-eslint/parser",
"parserOptions": {
"ecmaVersion": "latest",
"sourceType": "module",
"project": "tsconfig.json"
},
"plugins": ["react", "@typescript-eslint"],
"rules": {
// 加上這行
"import/no-extraneous-dependencies": ["error", { "devDependencies": true }]
}
}

6. 加入 prettier

需要安裝的套件:

  • prettier:core package
  • eslint-plugin-prettier:添加 prettier 相關的規則
  • eslint-config-prettier:設定 prettier plugin 的 config

接下來要處理 prettier 和 ESLint 相衝的問題,所以一樣把 .eslintrc.json 修改成底下:

1
2
3
4
5
6
7
8
9
10
11
12
13
14
15
16
17
18
19
20
21
22
23
{
"env": {
"browser": true,
"es2021": true
},
"extends": [
"airbnb",
"airbnb/hooks",
"airbnb-typescript",
"plugin:react/recommended",
"plugin:@typescript-eslint/recommended",
"plugin:prettier/recommended" // <- 請務必放在最後一個,這個順序是有意義的
],
"overrides": [],
"parser": "@typescript-eslint/parser",
"parserOptions": {
"ecmaVersion": "latest",
"sourceType": "module",
"project": "tsconfig.json"
},
"plugins": ["react", "@typescript-eslint"],
"rules": {}
}

附註:這邊的寫法是官方推薦的簡化寫法,其實原本的寫法是這樣

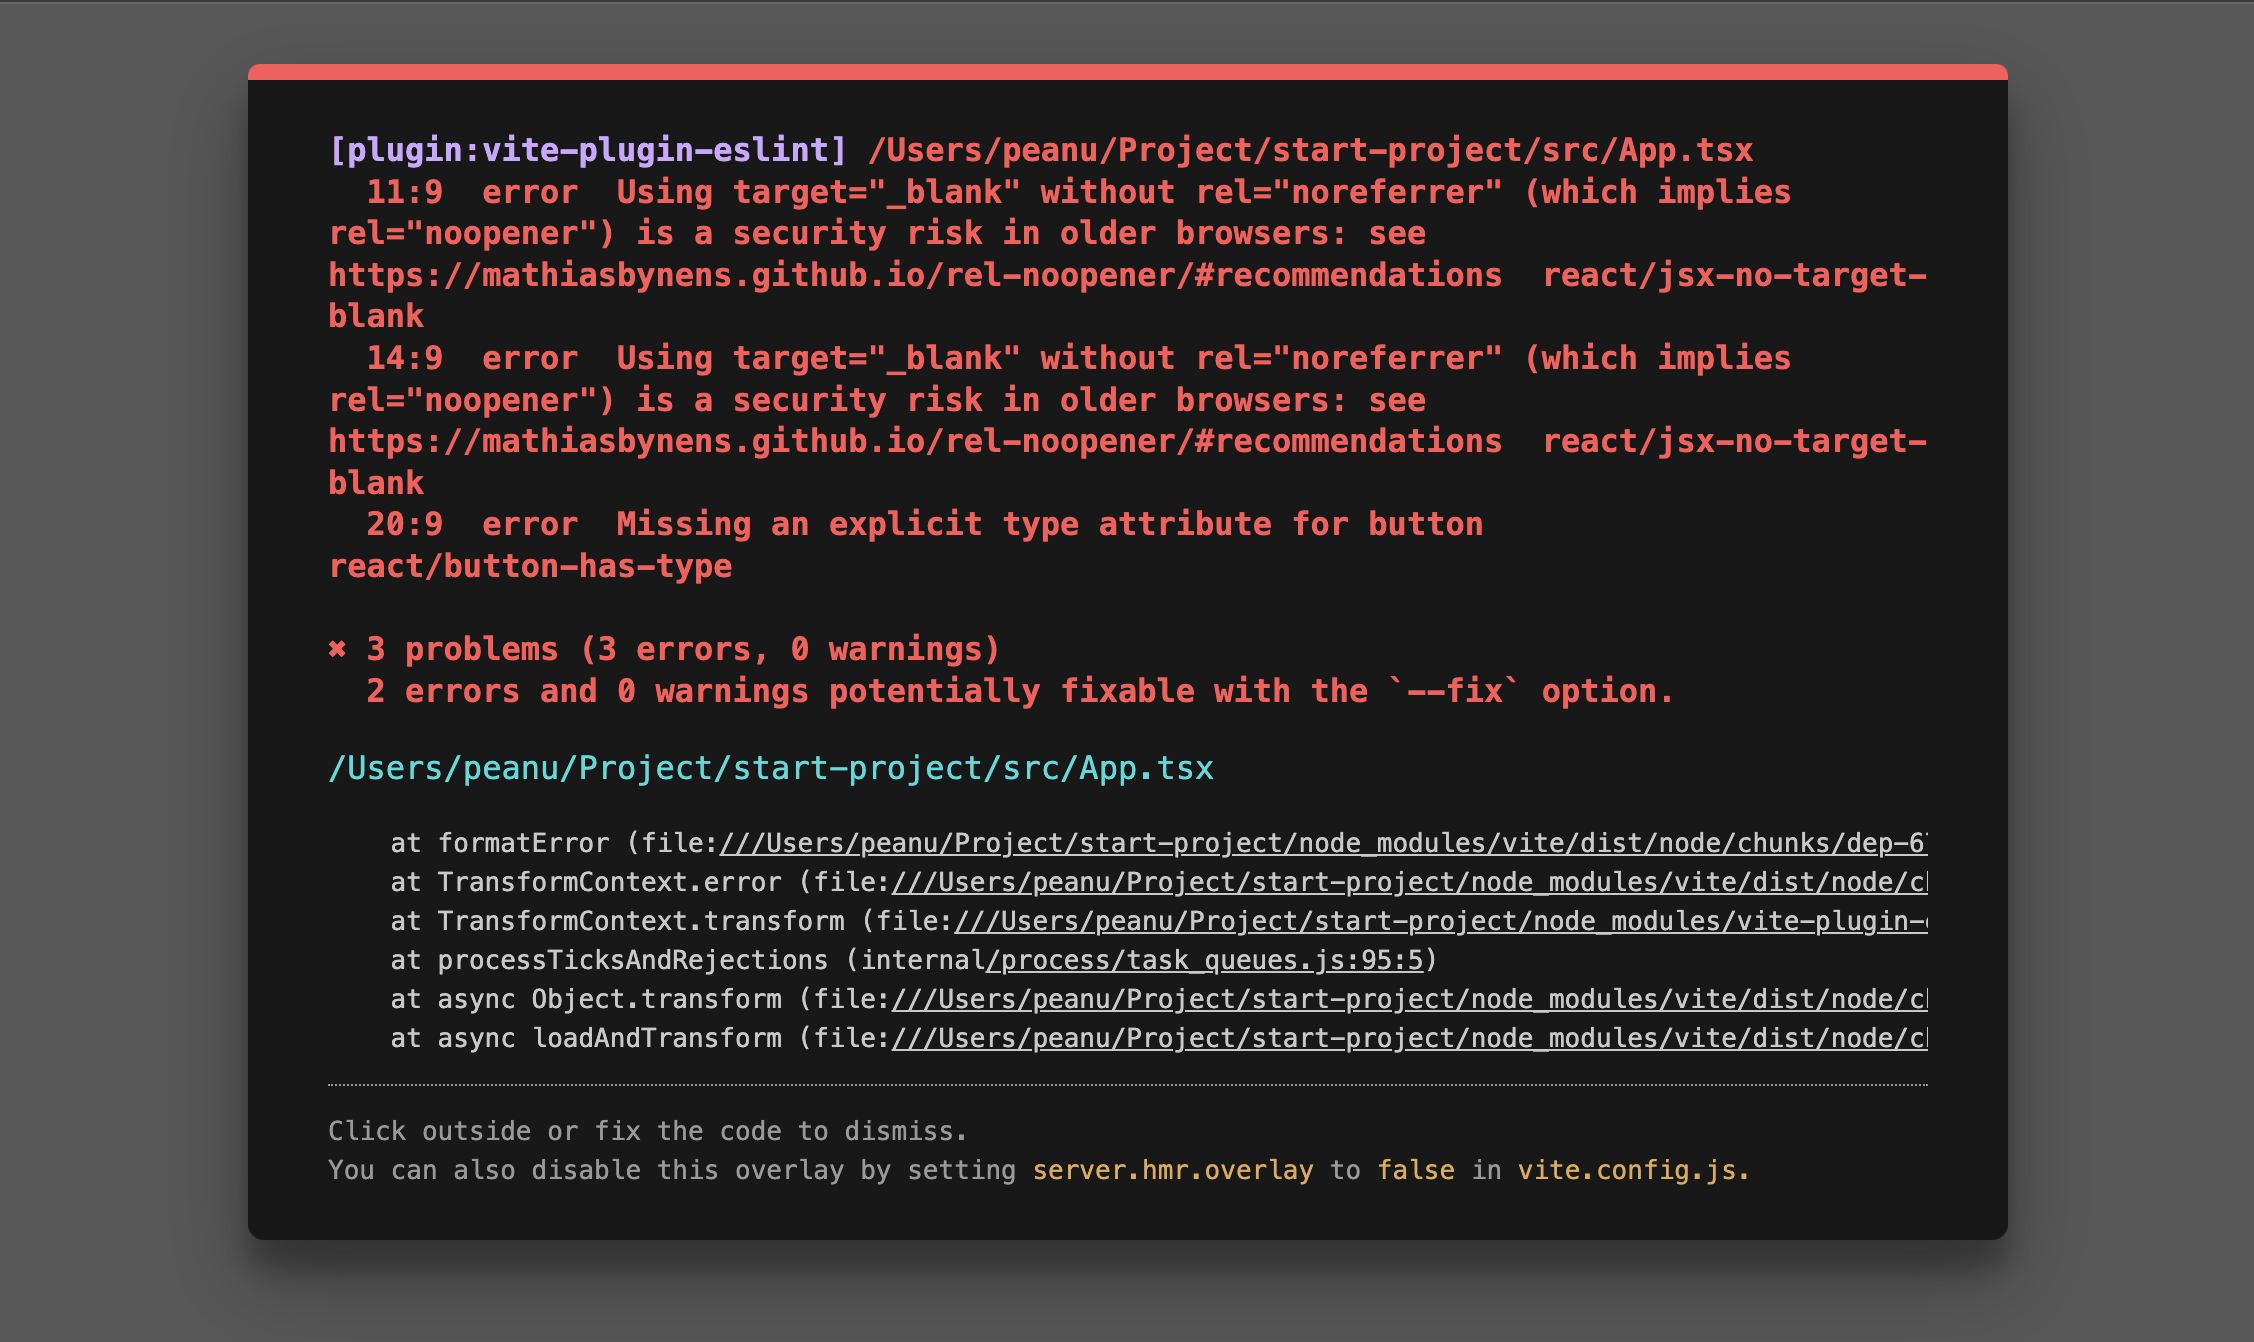
再強調一次一定要把 prettier 放在最後面,這樣子 ESLint 才會優先用 prettier 的規則來覆寫掉其他前面的規則,所以你應該會看到這樣的錯誤訊息:

example6-prettier

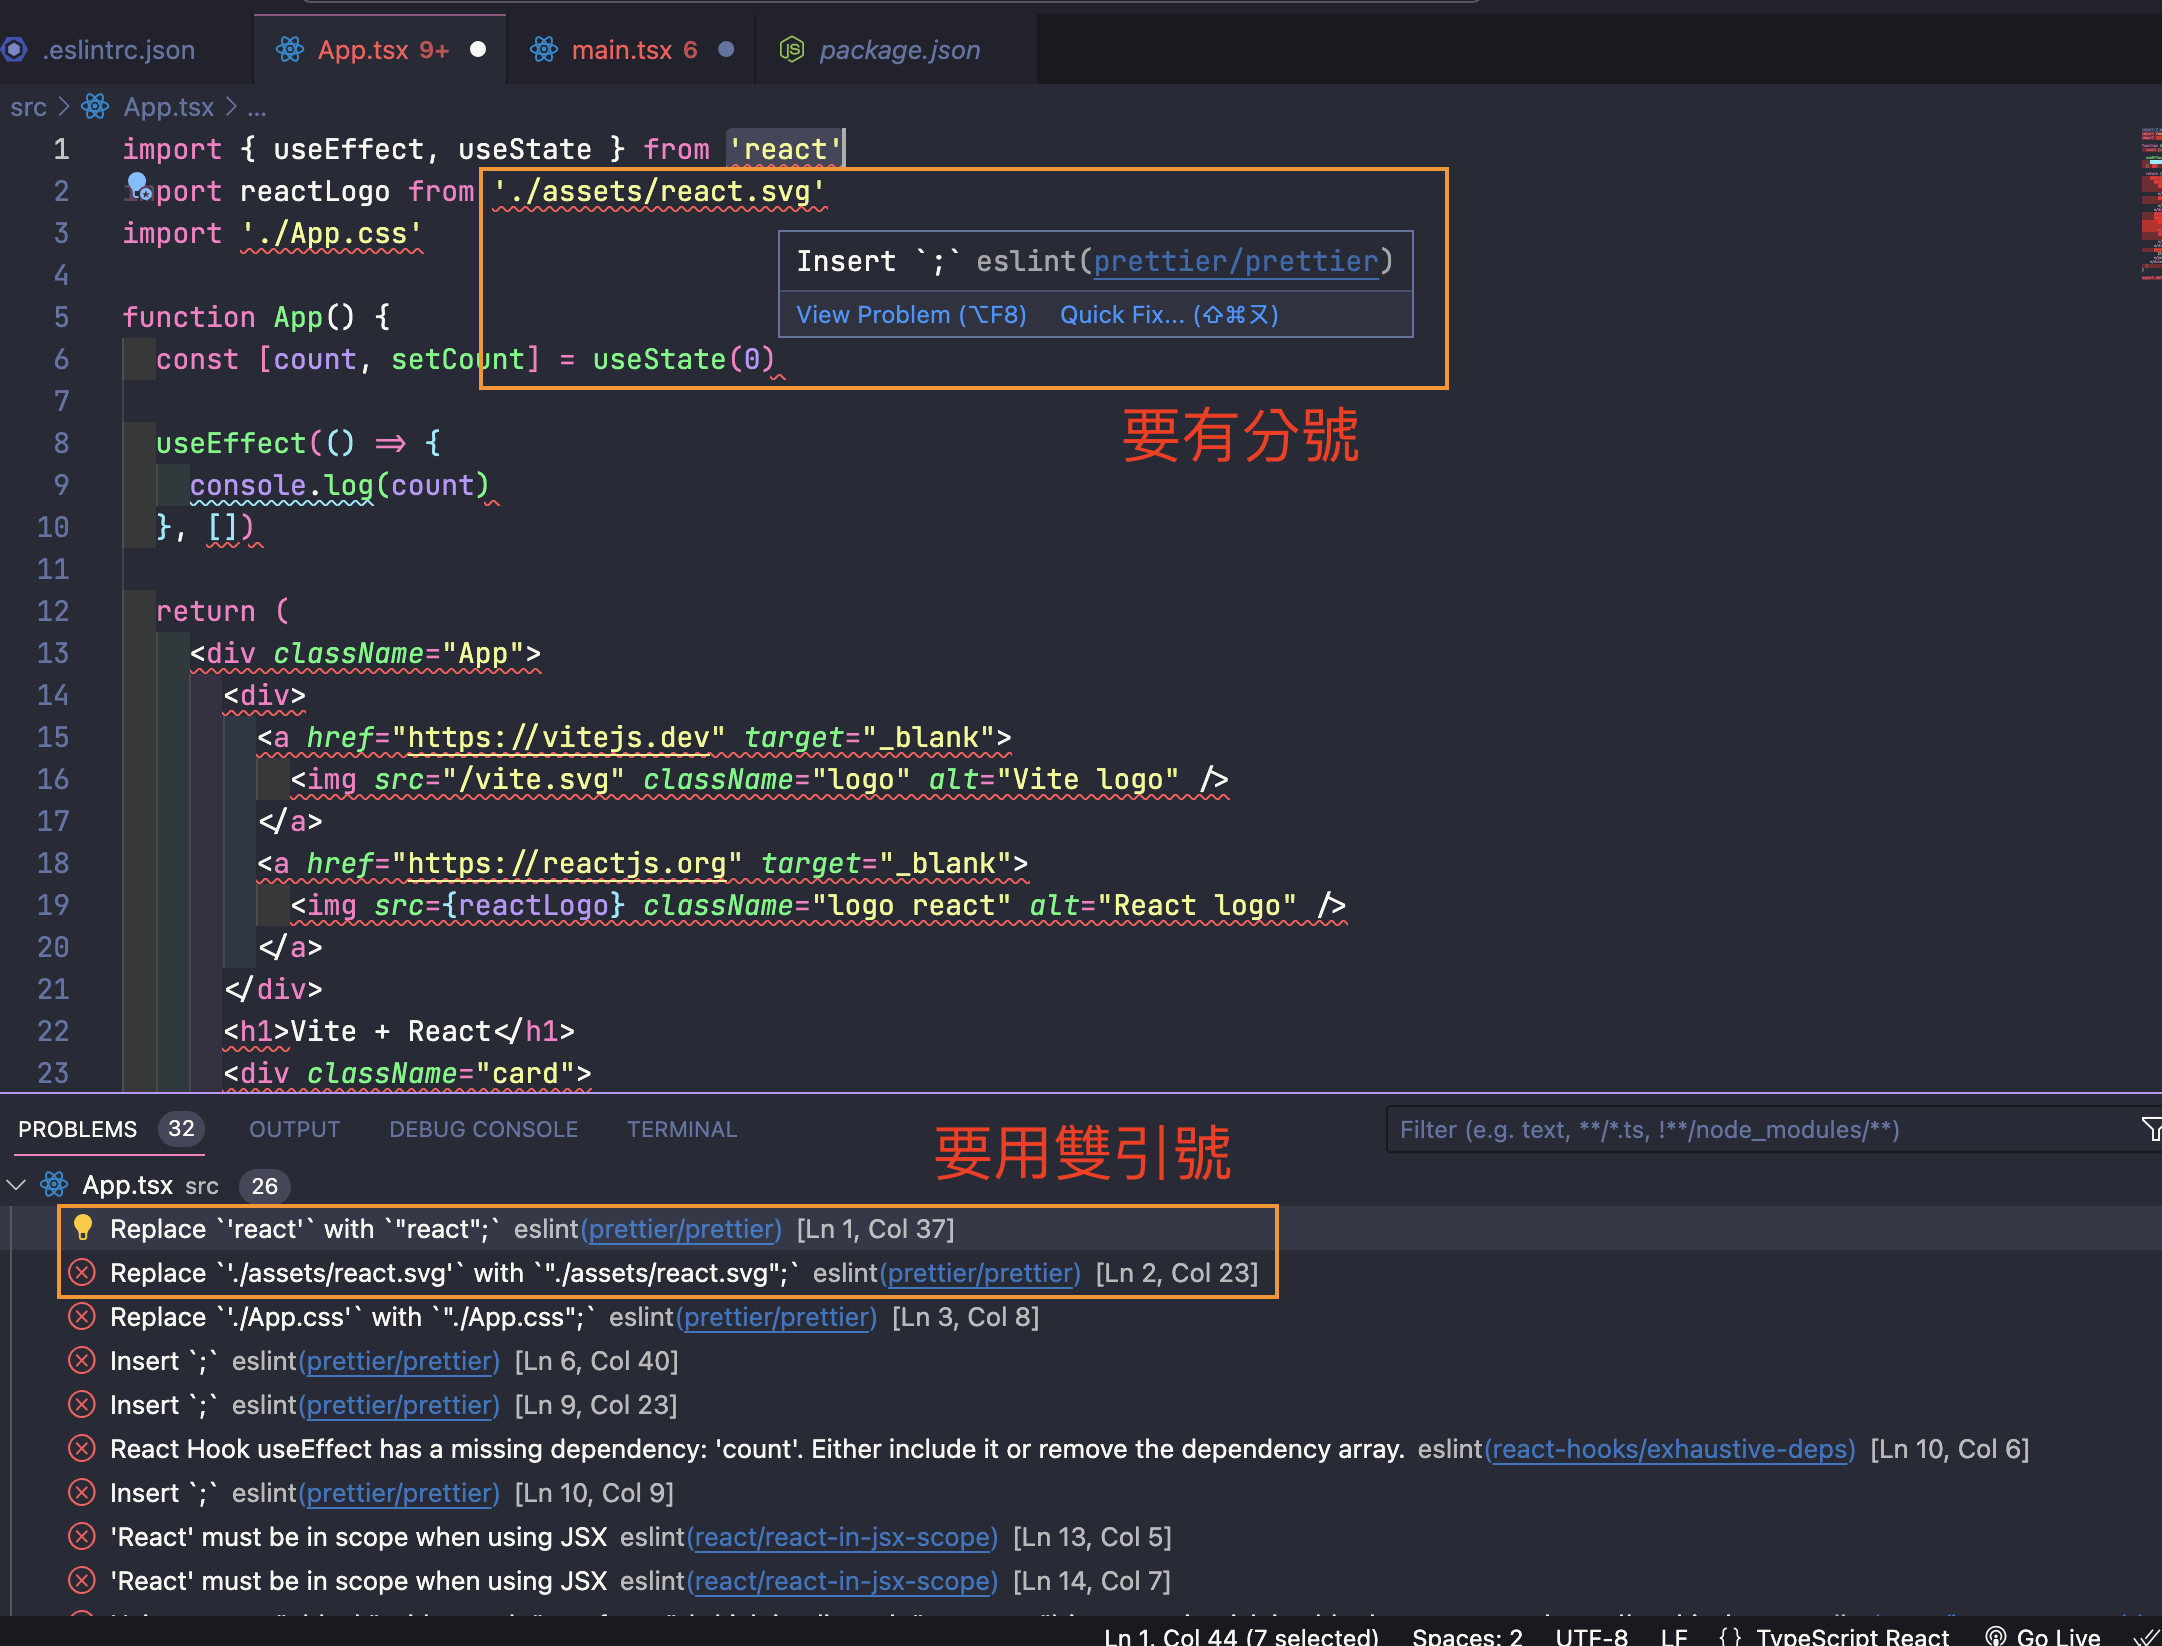
注意現在這些規則都是來自 prettier,而不是前面的規則。意思是指 prettier 擁有最大的優先權,所以不管前面的規則如何最後都得聽 prettier 的,這樣子等一下在格式化的時候就不會出現衝突的問題。

到目前為止已經完成 prettier 和 ESLint 的配置,接下來要添加 prettier config 檔案。

7. 設定 prettier config

接下來這邊就是團隊討論的時間了,這邊會透過 .prettierrc 來強制讓所有人的 prettier 用相同的條件去做格式化,這邊附上我個人比較偏好的設定:

1
2
3
4
5
6
7
8
9
{
"semi": false,
"singleQuote": true,
"jsxSingleQuote": true,
"trailingComma": "none",
"useTabs": false,
"tabWidth": 2,
"printWidth": 100
}

附註:這些規則等同於 ESLint 上的規則,所以沒有遵循的話也會出現提示訊息。

完成後執行 formatOnSave(VS-Code 的設定)以後就會看到所有 prettier 相關的訊息都消失囉:

example7-fomat-on-save

8. 調整部分 rules

設定完 prettier 以後,確實解決了和 ESLint 相衝的問題,不過還是會看到一些其他的錯誤訊息:
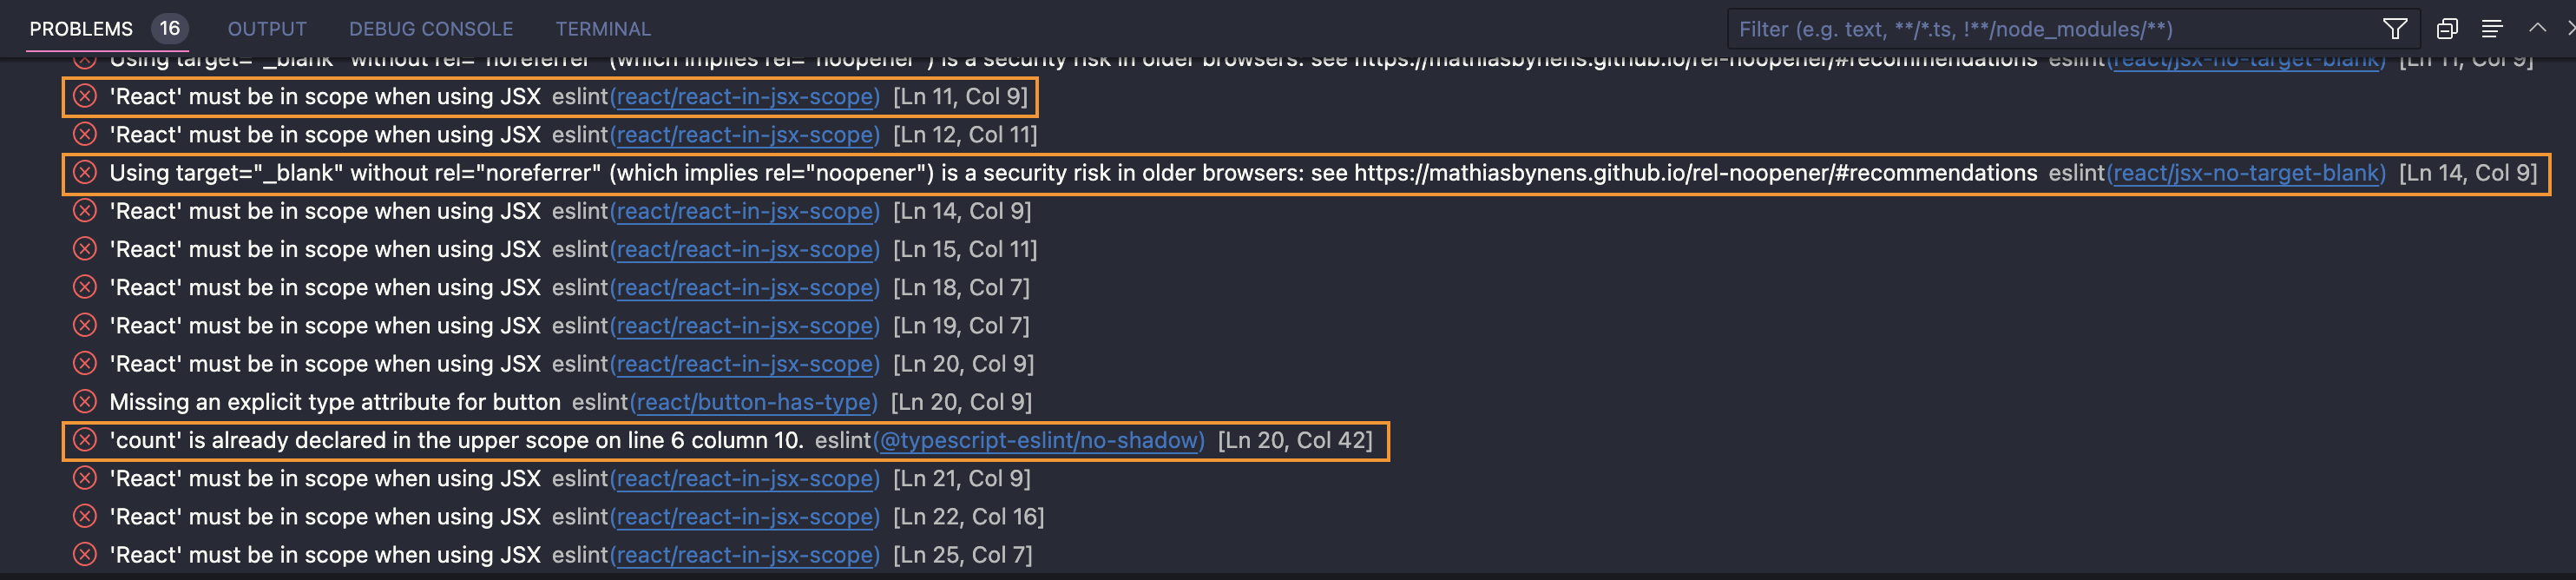
example8-other-errors

這邊的錯誤有三個:

  • react/react-in-jsx-scope:沒有宣告 React(舊版的 React 需要)
  • react/jsx-no-target-blank:當 target='_blank' 時需加上 rel="noreferrer" 來避免安全性問題
  • @typescript-eslint/no-shadow:出現同名稱的變數(雖然不同 scope 之間互不影響,但會影響到可讀性)

以這三個問題來說,我自己認為第一、三項是非必要的規則,所以可以到 .eslintrc.jsonrules 的部分修改成底下:

1
2
3
4
5
6
7
8
9
10
11
12
13
14
15
16
17
18
19
20
21
22
23
24
25
26
27
{
"env": {
"browser": true,
"es2021": true
},
"extends": [
"airbnb",
"airbnb/hooks",
"airbnb-typescript",
"plugin:react/recommended",
"plugin:@typescript-eslint/recommended",
"plugin:prettier/recommended"
],
"overrides": [],
"parser": "@typescript-eslint/parser",
"parserOptions": {
"ecmaVersion": "latest",
"sourceType": "module",
"project": "tsconfig.json"
},
"plugins": ["react", "@typescript-eslint"],
// 新增兩個自訂的行為
"rules": {
"react/react-in-jsx-scope": "off",
"@typescript-eslint/no-shadow": "off"
}
}

附註:可以調整的參數有 offwarnerror

修改完後就會看到只留下其他沒有被 off 的訊息:

example9-left-errors

特別寫這段只是想讓你知道其實你可以自己去決定 rules,ESLint 並沒有一定要依照某個 config 的規則,畢竟有些規則可能不適用於目前的專案(例如沒有宣告 React 的例子)。

到目前為止,已經處理好 ESLint 和 prettier 相關的設定。接下來會是一些和 vite 相關的額外需求,如果你對這些沒有興趣的話到這邊就可以結束了。

9. 讓 vite 結合 ESLint 功能

如果你以前是用 CRA(Create React App) 來建立專案的話,應該會對這個討人厭的畫面很熟悉:

example10-cra-error

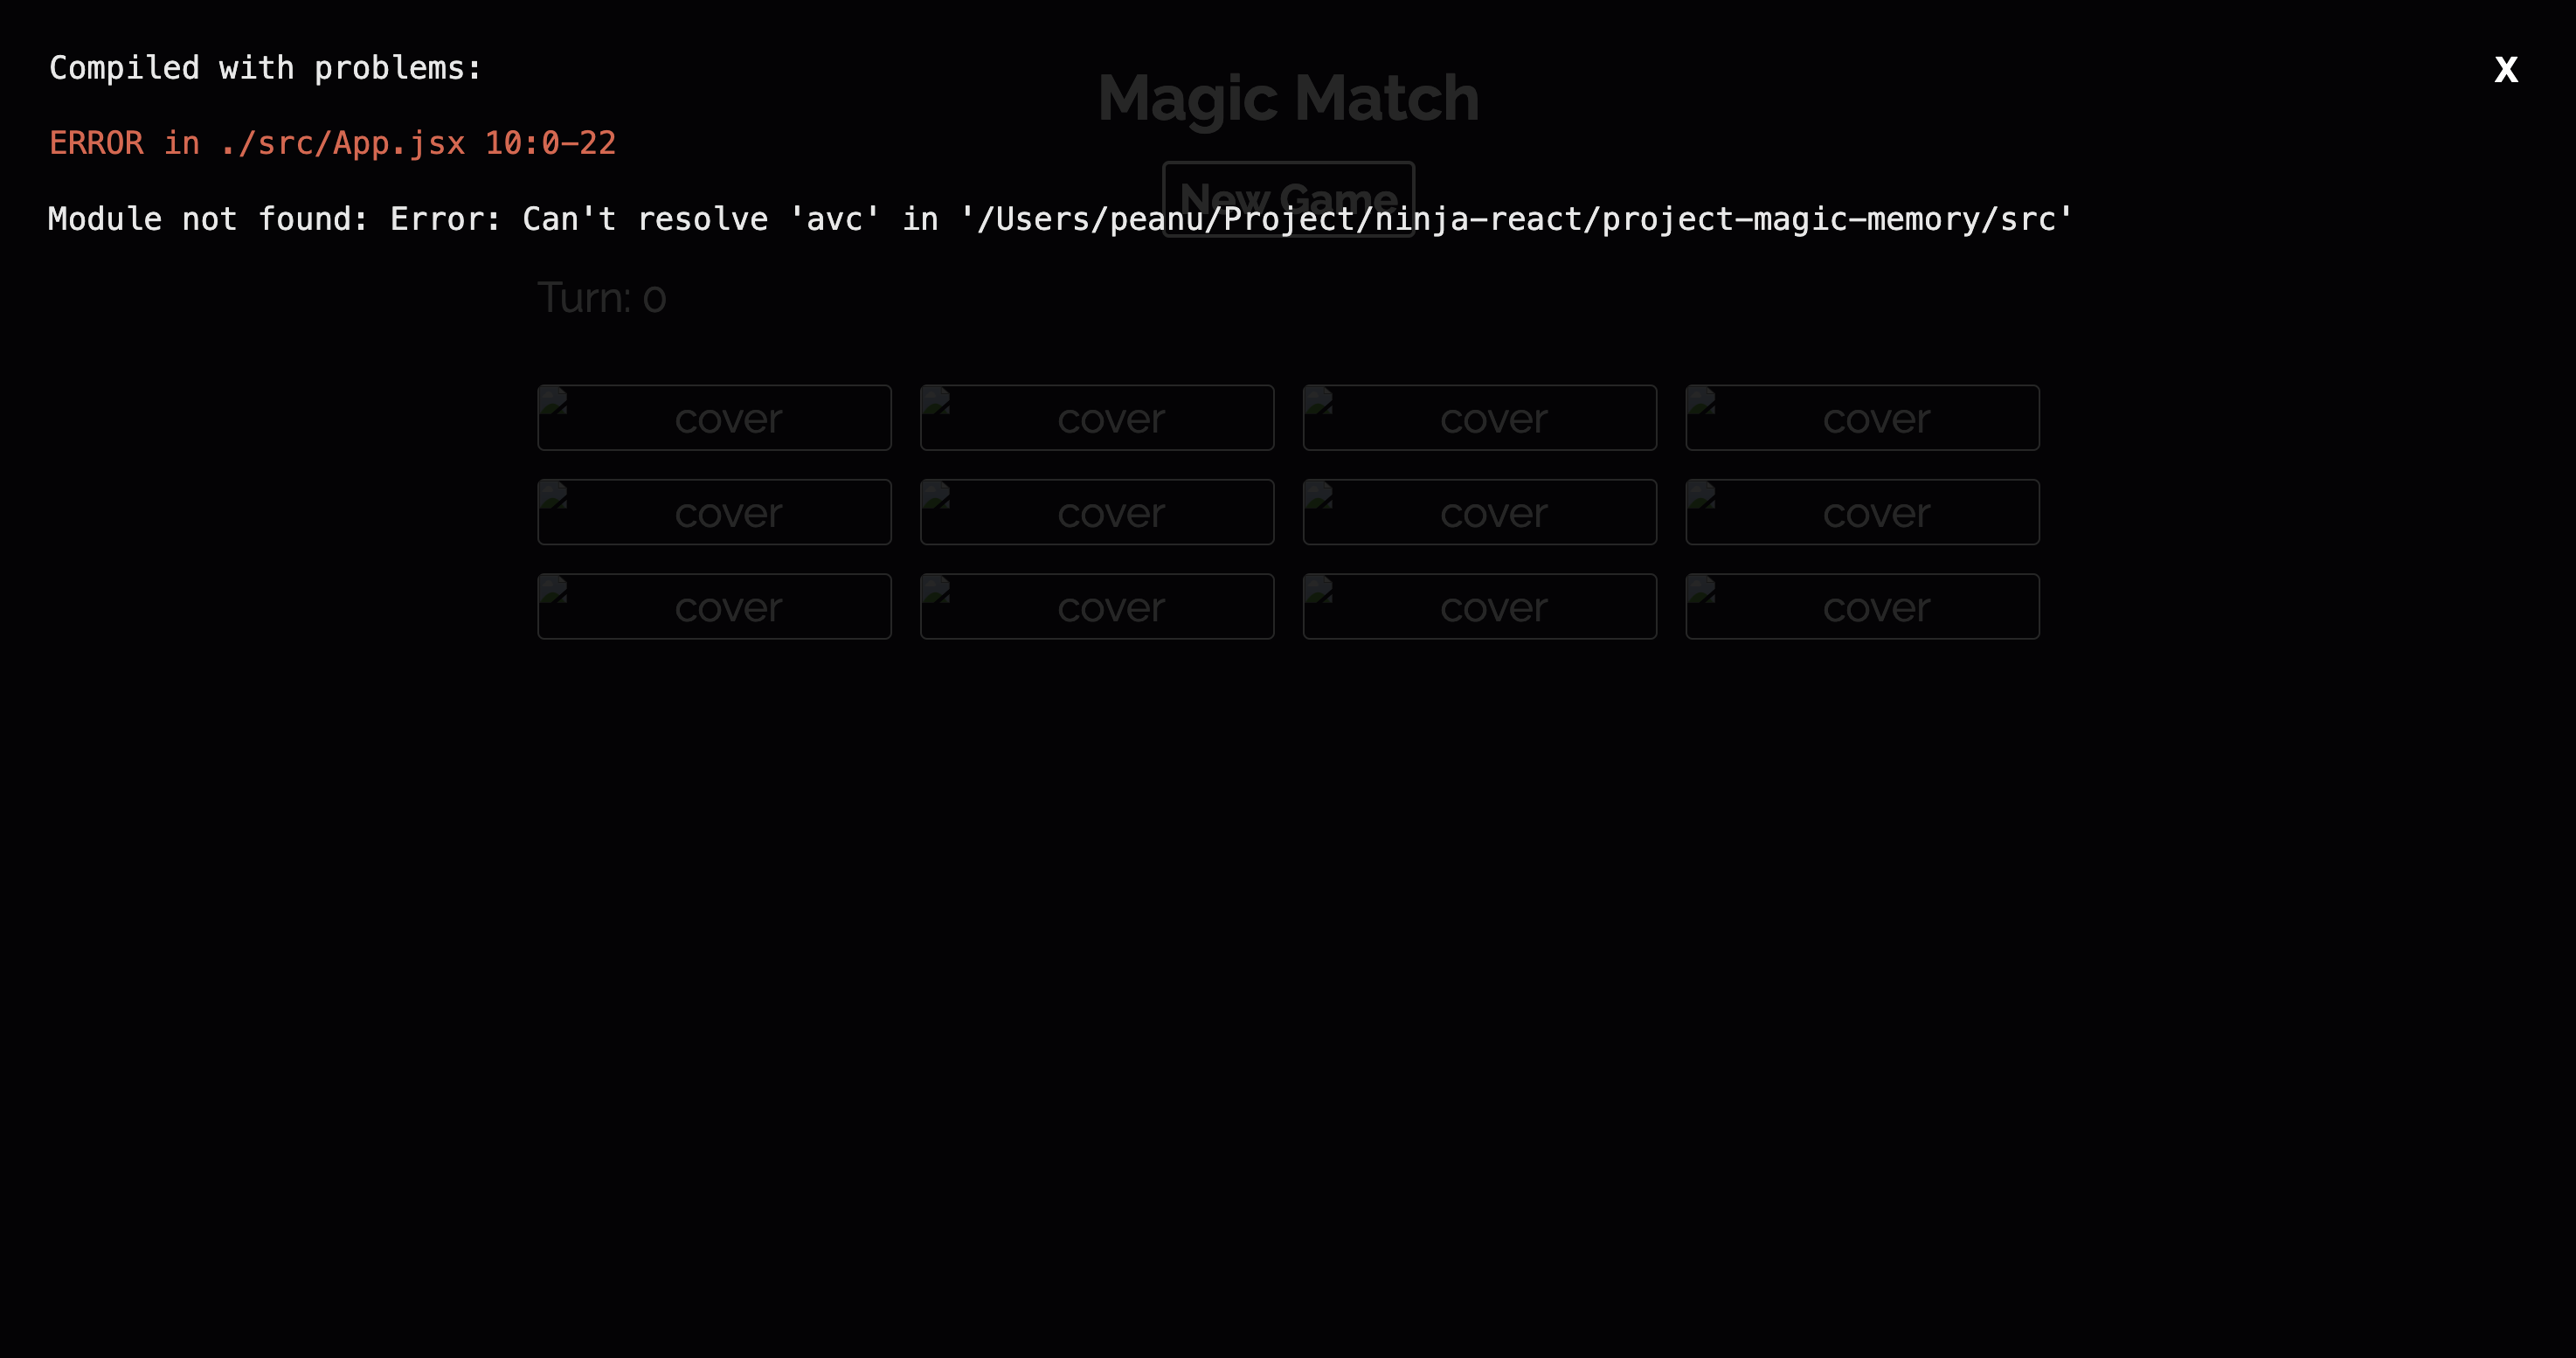
這邊想做的事情是讓 vite 可以結合 ESLint 的錯誤提示,讓 ESLint 一旦出現 Error 時就停止編譯,並產生跟 CRA 一樣的全屏警示:

example11-error-overlay

附註:一種不照規則來就讓你沒辦法開發的概念 XD

實現的方式很簡單,首先安裝 vite-plugin-eslint,接著到 vite.config.ts 加入底下內容:

1
2
3
4
5
6
7
8
import { defineConfig } from 'vite'
import react from '@vitejs/plugin-react'
import eslint from 'vite-plugin-eslint' // <- new

// https://vitejs.dev/config/
export default defineConfig({
plugins: [react(), eslint()] // <- new
})

設定完以後可以自己試著弄出一個 Error 看看,應該就會出現同樣的警示訊息了。

10. 設置 vite 在 import 時的 alias

在開始之前先解釋一個重要觀念:

  • VS-Code 是依據 tsconfig.json 的設定來顯示 import 路徑
  • Vite 是依據 vite.config.ts 的設定來編譯 import 路徑

也就是說,假設你現在把 tsconfig.jsonbaseUrl 設為 ./src,那 VS-Code 就會根據這項設定來顯示對應的路徑,這是正常的行為沒錯。

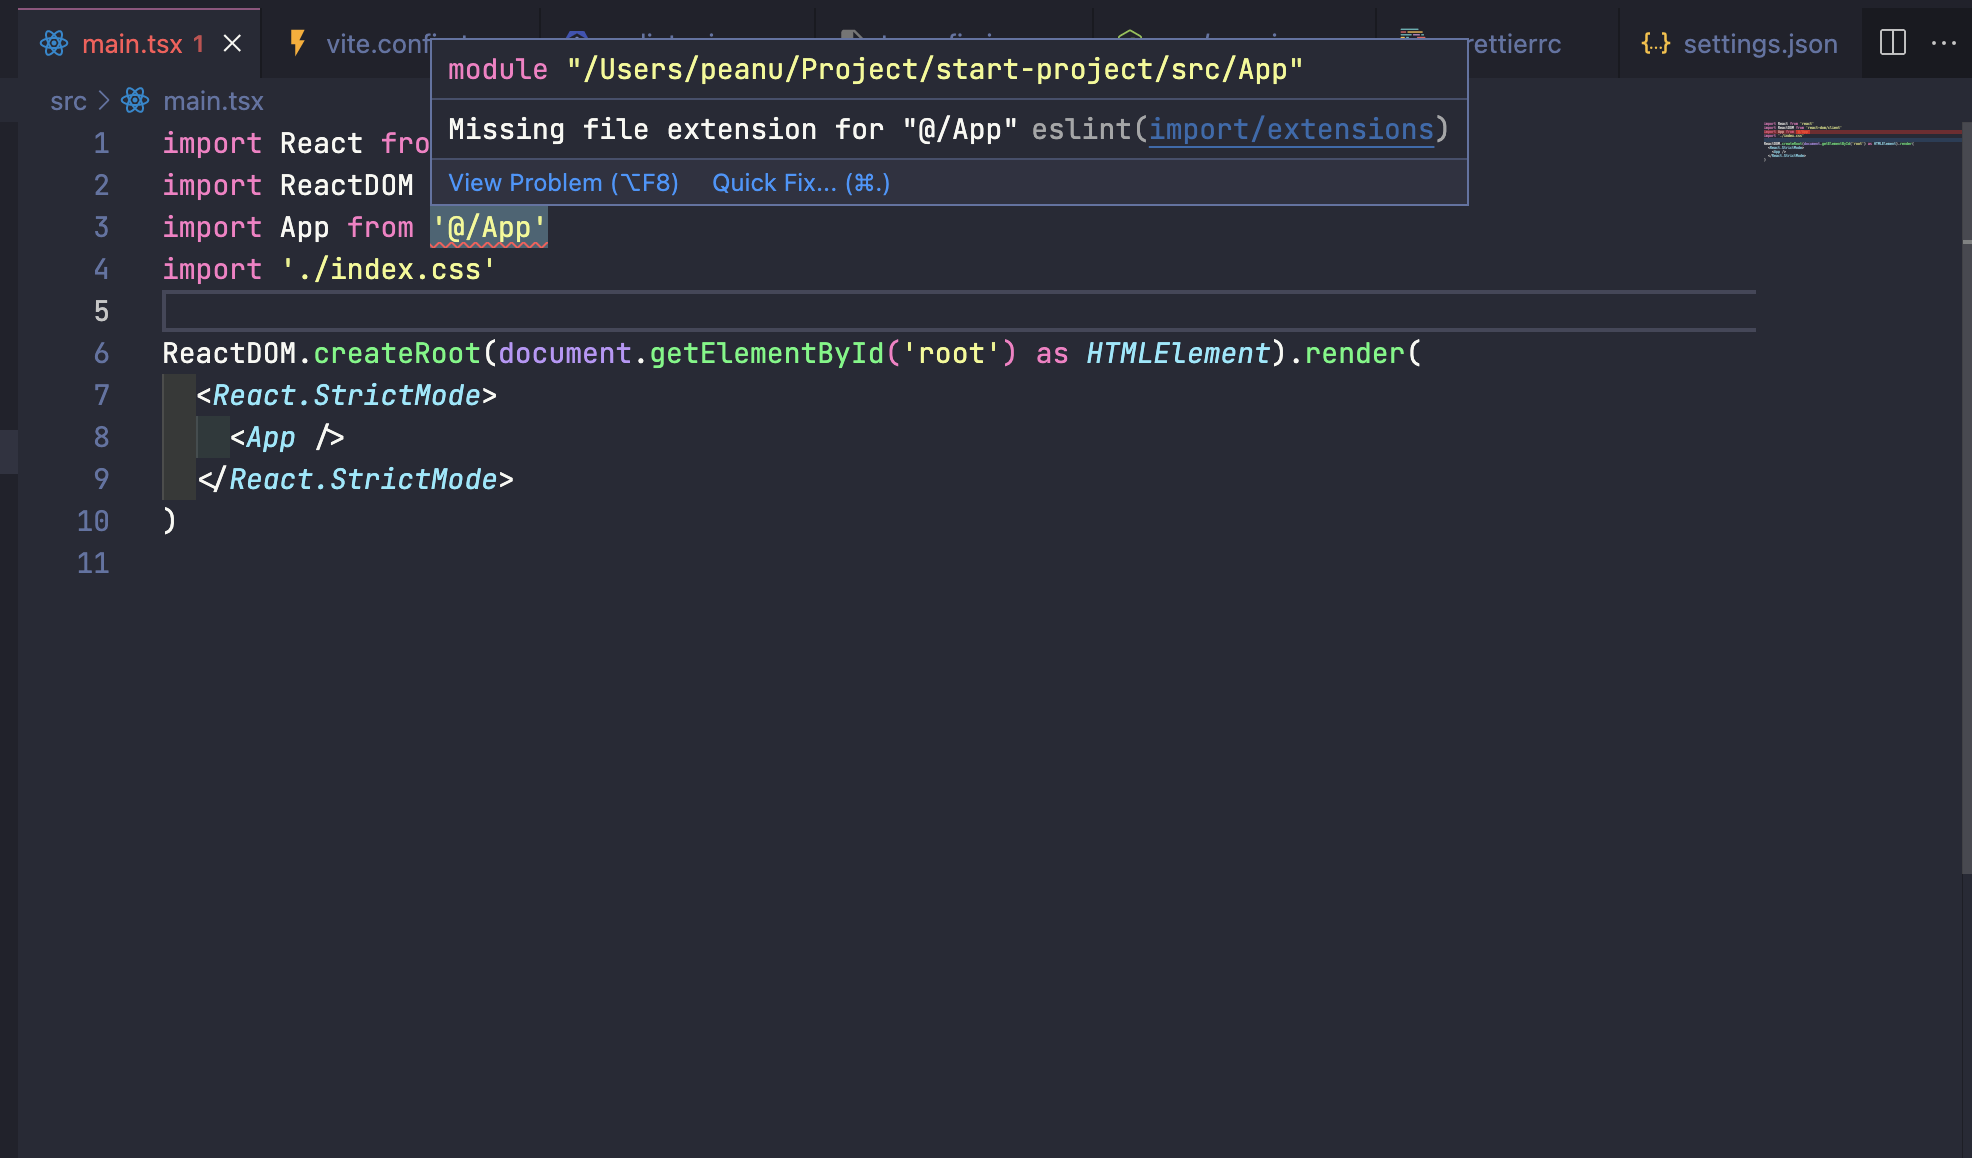
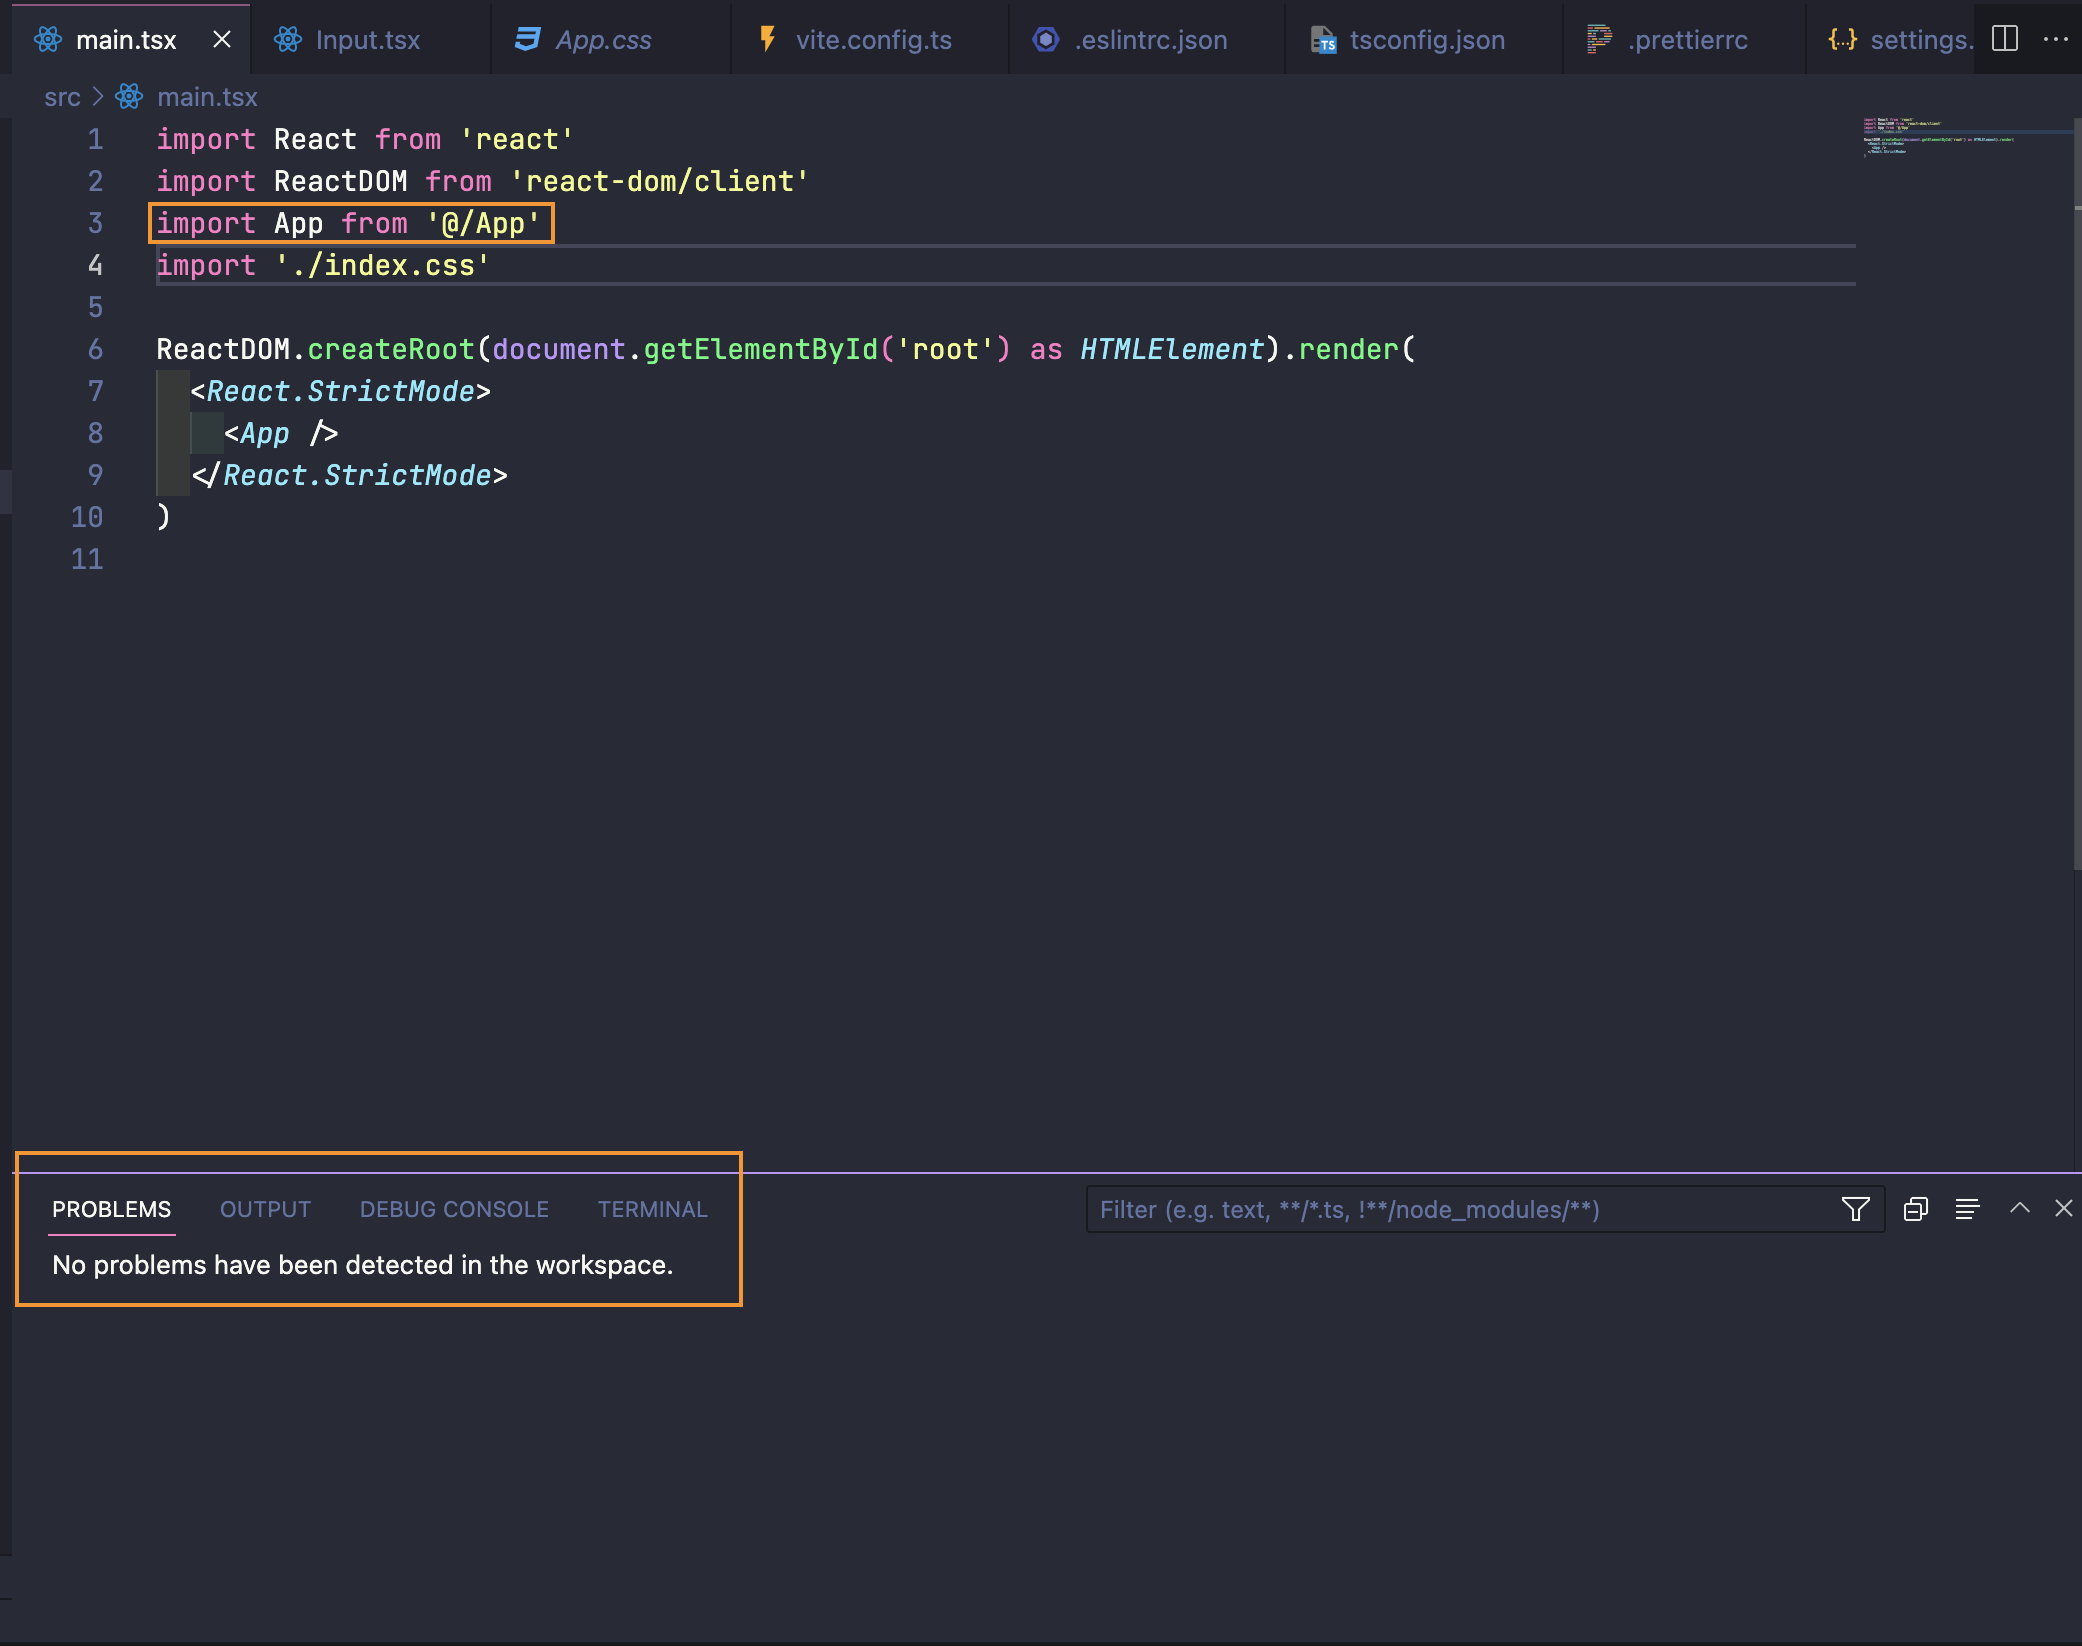
但接著重點來了,雖然在 VS-Code 上看似一切很完美,但 vite 可就不是這樣了,因為 vite 並不會根據 tsconfig.json 的設定下去編譯,所以你最後跑出來的結果會是有問題的:

example12-failed-to-import

附註:注意 VS-Code 確實有依照 tsconfig.json 的設定,所以在輸入 'App' 的時候才會出現對應的自動補齊。

所以這邊要處理的問題就是「確保兩邊的設定是同步的」。如果 tsconfig.jsonbaseUrl: './src',那 vite.config.ts 就也要有相對應的設定來處理編譯時的路徑問題。

這邊你可以用官方提供的 alias 方式去處理,例如:

1
2
3
4
5
6
7
8
9
10
import * as path from 'path'

export default defineConfig({
// ...
resolve: {
alias: {
'@': path.resolve(__dirname, 'src')
}
}
})

這樣子 vite 在編譯時看到 @ 的時候就會自動當成是 src

但我自己更推薦用 vite-tsconfig-paths 來處理。它是 vite 的一個 plugin,能夠讓 vite 自動根據 tsconfig.json 的設定下去做編譯,就不用自己處理同步的問題了。

安裝好後依照文件裡的說明把 vite-config-ts 修改成底下:

1
2
3
4
5
6
7
8
9
import { defineConfig } from 'vite'
import react from '@vitejs/plugin-react'
import eslint from 'vite-plugin-eslint'
import tsconfigPaths from 'vite-tsconfig-paths' // <- new

// https://vitejs.dev/config/
export default defineConfig({
plugins: [react(), eslint(), tsconfigPaths()] // <- new
})

這樣子 vite 的路徑就會直接參照 tsconfig.json 的 config 下去做編譯囉。

還沒完,還有另外一個問題

如果你有用到 alias 的功能的話,會發現這時候換 ESLint 出來哀嚎了:

1
2
3
4
5
6
7
8
9
10
{
"compilerOptions": {
"target": "ESNext",
"baseUrl": "./src",
"paths": {
"@/*": ["./*"] // <- alias
}
// ...
}
}

example13-failed-to-import-by-eslint

當時寫到這裡時腦海中突然想起 卡米狗 曾經說過的經典語錄:

工程師的日常就是除了一個錯之後看到的不是正常,而是看到下一個錯誤訊息。

要有耐心。

總而言之,這邊要做的事情跟剛剛差不多。剛剛是叫 vite 去讀 tsconfig.json 來做編譯,現在變成是叫 ESLint 去讀 tsconfig.json 來做 linting(因為 ESLint 不會自動去讀 tsconfig.json),所以要安裝另一個套件是:eslint-import-resolver-typescript

安裝好後把 .eslintrc.json 修改成底下:

1
2
3
4
5
6
7
8
9
10
11
12
13
14
15
16
17
18
19
20
21
22
23
24
25
26
27
28
29
30
31
32
33
34
35
36
{
"env": {
"browser": true,
"es2021": true
},
"extends": [
"airbnb",
"airbnb/hooks",
"airbnb-typescript",
"plugin:react/recommended",
"plugin:@typescript-eslint/recommended",
"plugin:prettier/recommended"
],
"overrides": [],
"parser": "@typescript-eslint/parser",
"parserOptions": {
"ecmaVersion": "latest",
"sourceType": "module",
"project": "tsconfig.json"
},
"plugins": ["react", "@typescript-eslint"],
// 加上 settings 這段
"settings": {
"import/resolver": {
"typescript": {
"alwaysTryTypes": true,
"project": "tsconfig.json"
}
}
},
"rules": {
"react/react-in-jsx-scope": "off",
"@typescript-eslint/no-shadow": "off",
"import/no-extraneous-dependencies": ["error", { "devDependencies": true }]
}
}

調整完後應該就能看到錯誤消失囉:

example14-solve-eslint-import-problem

11. 加上環境變數

最後這一步是我自己工作上的需求,但我想說不定有人也有相同的需求所以就順便寫下來吧。

這邊對於環境變數的建立不會解釋太多,想知道細節的話可以參考 Vite Enviroment Variable官方文件

首先,這邊想切割的環境分別為:

  • dev
  • demo
  • production

所以會建立 .env.dev.env.demo.env.production 這三個檔案。

接著我希望當我執行不同的 build 指令時能去讀取對應的環境變數檔案,所以 package.json 會修改成這樣:

1
2
3
4
5
6
7
"scripts": {
"start": "vite",
"build": "tsc && vite build", // <- 讀取 .env.production
"demo": "tsc && vite build --mode demo", // <- 讀取 .env.demo
"dev": "tsc && vite build --mode dev", // <- 讀取 .env.dev
"preview": "vite preview"
}

此外,我也希望最後 build 出來的檔案可以放在不同的資料夾中,所以會把 vite-config.ts 修改成這樣:

1
2
3
4
5
6
7
8
9
10
11
12
13
14
15
16
17
18
19
20
import { defineConfig } from 'vite'
import react from '@vitejs/plugin-react'
import eslint from 'vite-plugin-eslint'
import tsconfigPaths from 'vite-tsconfig-paths'

const pathMapping = {
demo: './build-demo',
dev: './build-dev',
production: './build-production'
} as { [key: string]: string }

// 自動接收到一個 obj,其中 obj.mode 會對應到 vite build --mode <string>
export default ({ mode }: { mode: string }) => {
return defineConfig({
plugins: [react(), eslint(), tsconfigPaths()],
build: {
outDir: pathMapping[mode] ?? './dist'
}
})
}

這邊如果在 build 的時候出錯通常是跟 typescript 編譯時的型別錯誤有關,可以看一下錯誤訊息並且修正即可。

如果你已經跟著每一步做到這邊,恭喜你!整個 start project 就已經建立完囉。

結語

整個 ESLint 設定的流程說複雜不複雜,說容易也不容易,畢竟走下來會發現常常碰到裝了 A 以後 B 就出問題,又或者是因為 TypeScript 的關係要處理的相容問題變的麻煩許多,所以我其實也花了大概一天的時間才把整個前後關係給釐清。

會寫這篇的契機主要還是因為網路上的資源比較零散,也許是因為大家都是從網路上互相參考的關係,總覺得比較熱門的內容都長得有點類似,連沒講清楚的地方也剛好很巧的沒有人提到,所以只好自己試著把這些零散的內容給組再一起,試著讓它完整更清楚一些。

我覺得學一樣東西最重要的還是理解那樣的東西的核心部分,像我寫完這篇以後就對 ESLint 的整個概念就清楚了許多,在走每一步的時候也很清楚自己在做什麼事情。如果上面的地方有哪邊覺得不太懂的話,我想可能就是你對 ESlint 的部分沒有很熟所以才會有這些疑問,建議可以參考最下面附的資源,我覺得這些對我當初在建構的時候帶來了不少幫助。

最後,如果你真的很懶的自己走這每一步的話,以上的完成品我有放在 GitHub 上,可以參考底下連結:

參考資料

Vite-Environment Variable ESlint - 配置一個 Airbnb 環境
Your browser is out-of-date!

Update your browser to view this website correctly. Update my browser now

×